WP Rocket Plugin And Optimising Performance

Contents
- 1 WP Rocket Plugin
- 2 The Magic Numbers
- 3 How to Optimise Website Speed
- 4 Page Speed Insights
- 5 Improving Your Scores using the WP Rocket plugin
- 6 Installing WP Rocket Plugin
- 7 Installing Imagify
- 8 Setting up WP Rocket
- 9 Cache
- 10 File Optimisation
- 11 Media
- 12 Pre-Load
- 13 Advanced Rules
- 14 Database
- 15 CDN
- 16 Heartbeat
- 17 Add-ons
- 18 Setup Cloudflare Account
- 19 Cloudflare Menu
- 20 The Finer Details of using WP Rocket Plugin
WP Rocket Plugin
I have been wanting to write about WP Rocket Plugin and indeed how to optimise website speed using it for a long time now but never got around to it. But now that we offer this as a service I thought it was about time I did 🙂
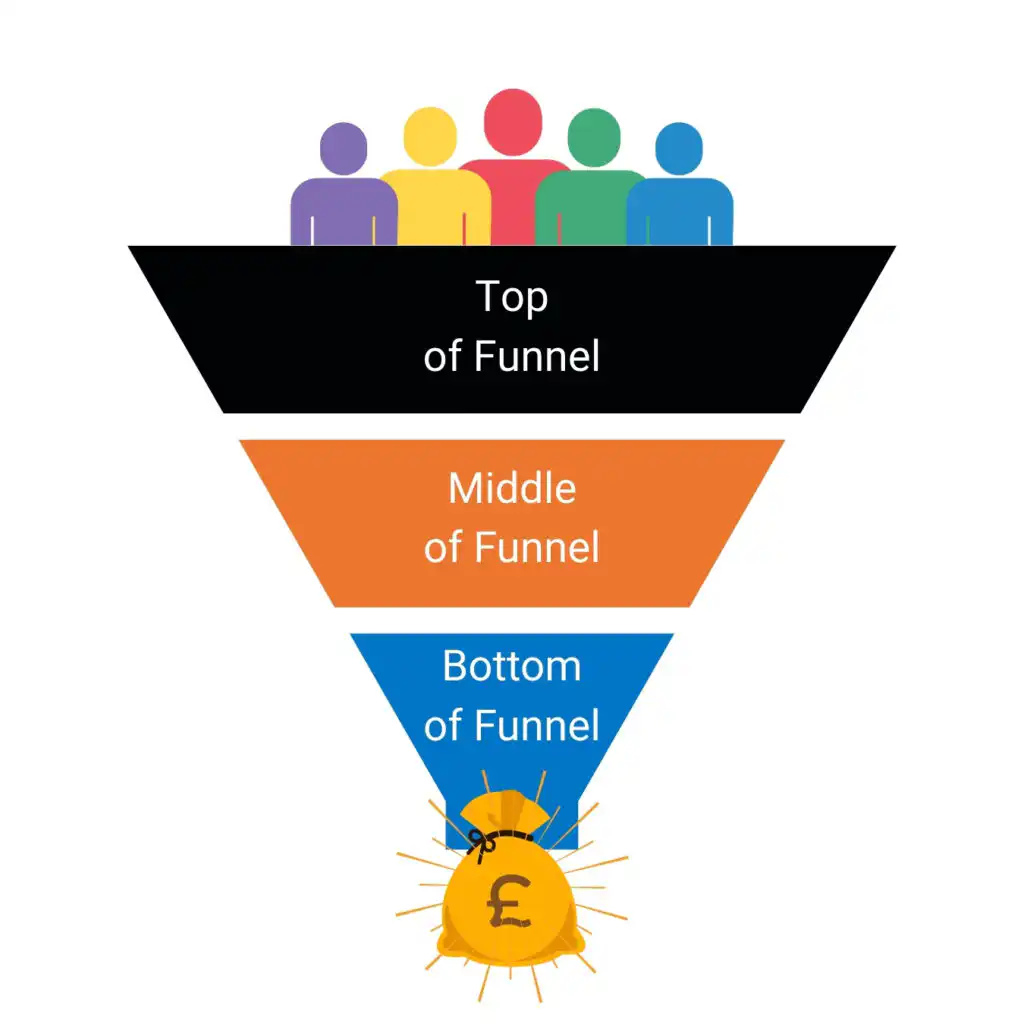
You may or may not know this but website performance is a major Google ranking factor which was stated in this post by them back in 2010 Using site speed in web search ranking. Several search engine specialists have also commented on this as we can see here in Search Engine Journal. There are many reasons why it is important but not least because of how fast a user (think potential client) will click away from your site if it is slow loading and providing a bad user experience. If you are trying to sell anything online it is imperative that you do not give your potential customers and clients an excuse to click away from your website. Google of course also knows this which is why it is up there as a ranking factor.
The Magic Numbers
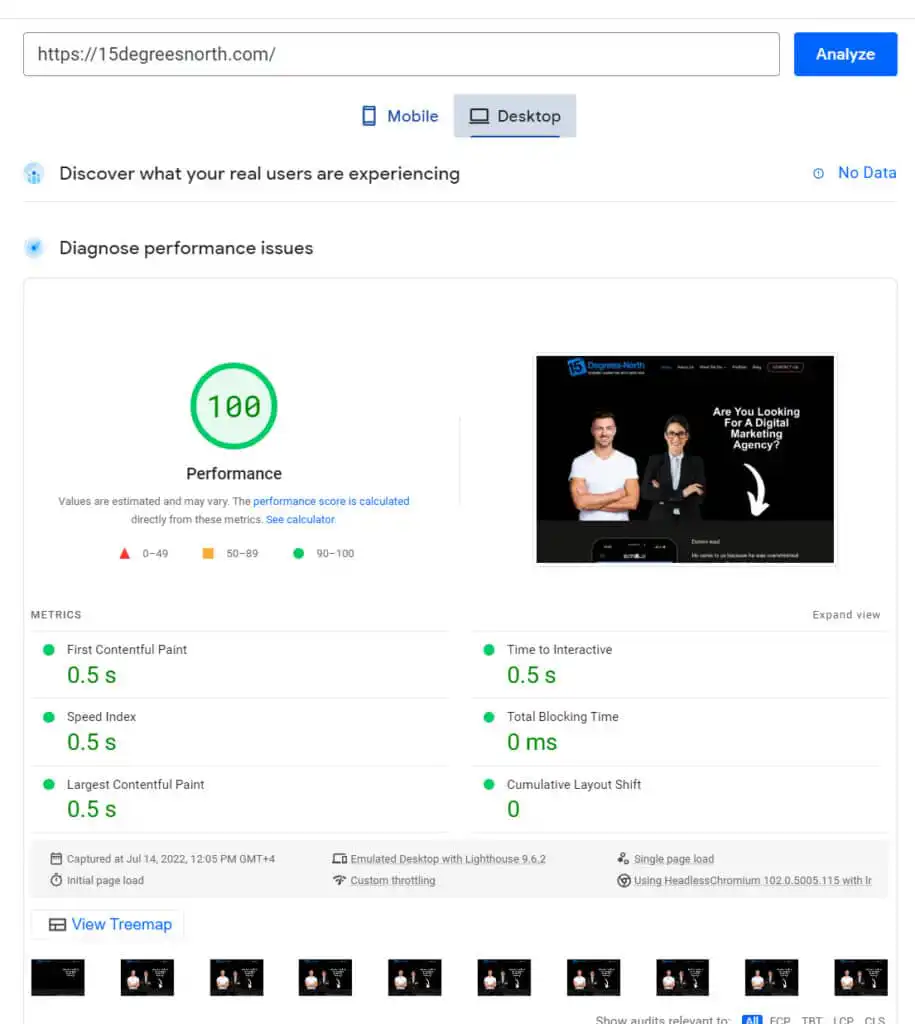
This is what you’re aiming for when you optimise a website and I have to admit that it can become obsessive! You’re aiming to try and get your numbers in the green and you’ll be fine. I must admit that it does annoy me that we have 100/98 LOL. We shall have to try and find that extra 2 points on mobile to satisfy my OCD for neatness!
Desktop Results:
These are our current results for this website.
Mobile Results:
On mobile, we are just shy of perfection.
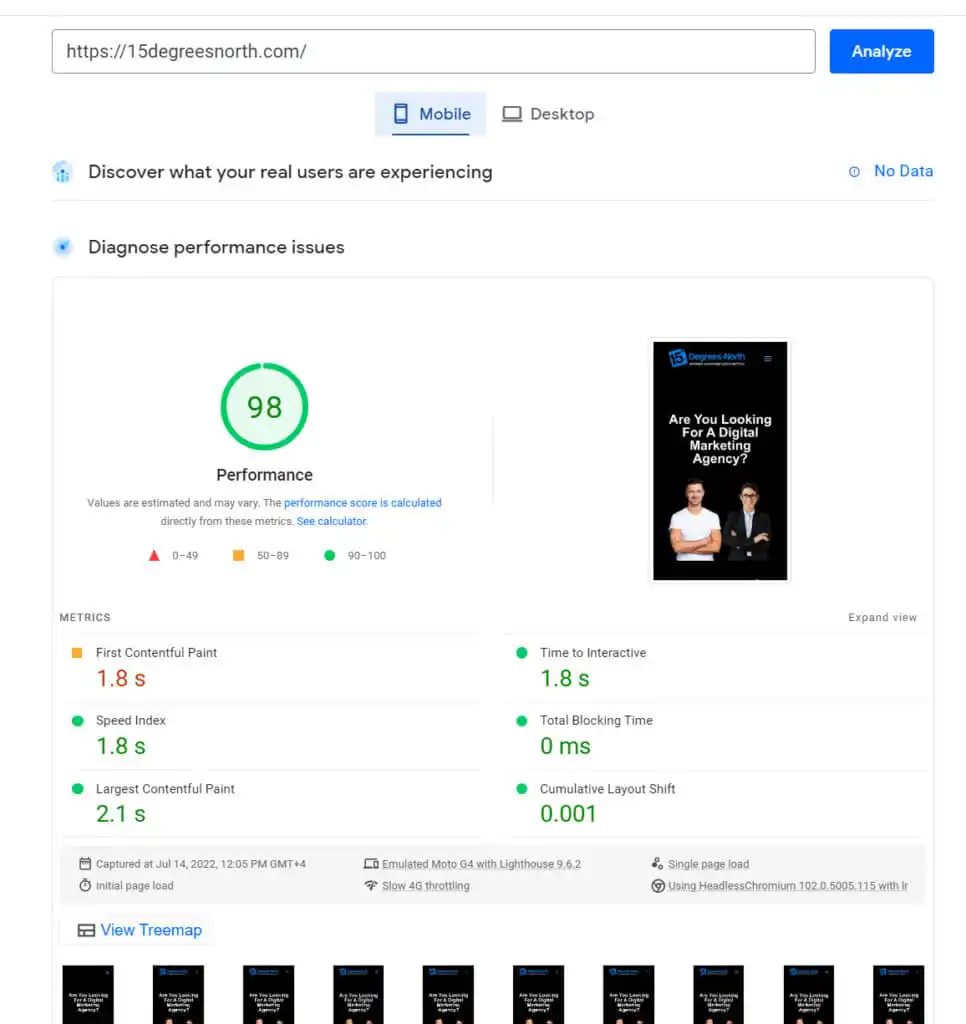
I should reiterate here that anywhere in the green is good in Google’s eyes so aim for 90 – 100 as they suggest but if you’re like me you will get obsessive over getting 100/100. Now that we have a baseline on 15DegreesNorth we will play around with mobile and that first contentful paint to find the extra 2 points without losing quality in the images.
I want to add that we are only talking here about optimising WordPress using WP Rocket Plugin and in our case using DiVi as the main theme and builder. Yes, we know that there are other builders and themes out there that are lighter and faster than DiVi but we love DiVi and wanted to make our site work with it. We have zero interest in trying to optimise Shopify, Wix, Squarespace or any of the other website builders out there. They all present their challenges and some of those you won’t be able to overcome.
How to Optimise Website Speed
So we come to it. How did we use the WP Rocket plugin on our site and how can you do it on yours. The following sections of this post will run you through our settings in the WP Rocket plugin and what we did to achieve 100/98 (might be 100/100 by the time I’m finished writing this post). I am not going to discuss all of WP Rockets settings as they have very useful guides for each setting and as you will learn no two sites are the same anyway. You have to play around with your setup until you find the sweet spot and test each change you make.
Page Speed Insights
So first things first you need a baseline to work with. Head on over to Google Page Speed Insights and put your website URL in the bar and hit go. Once it has done its thing you need to note down all the recommendations. I chose pressable for this as they provide WordPress hosting services and they had written an article on WordPress optimisation. You can use GTMetrix if you wish but as we are trying to please Google we wanted to use Google’s tool.
Mobile Results:
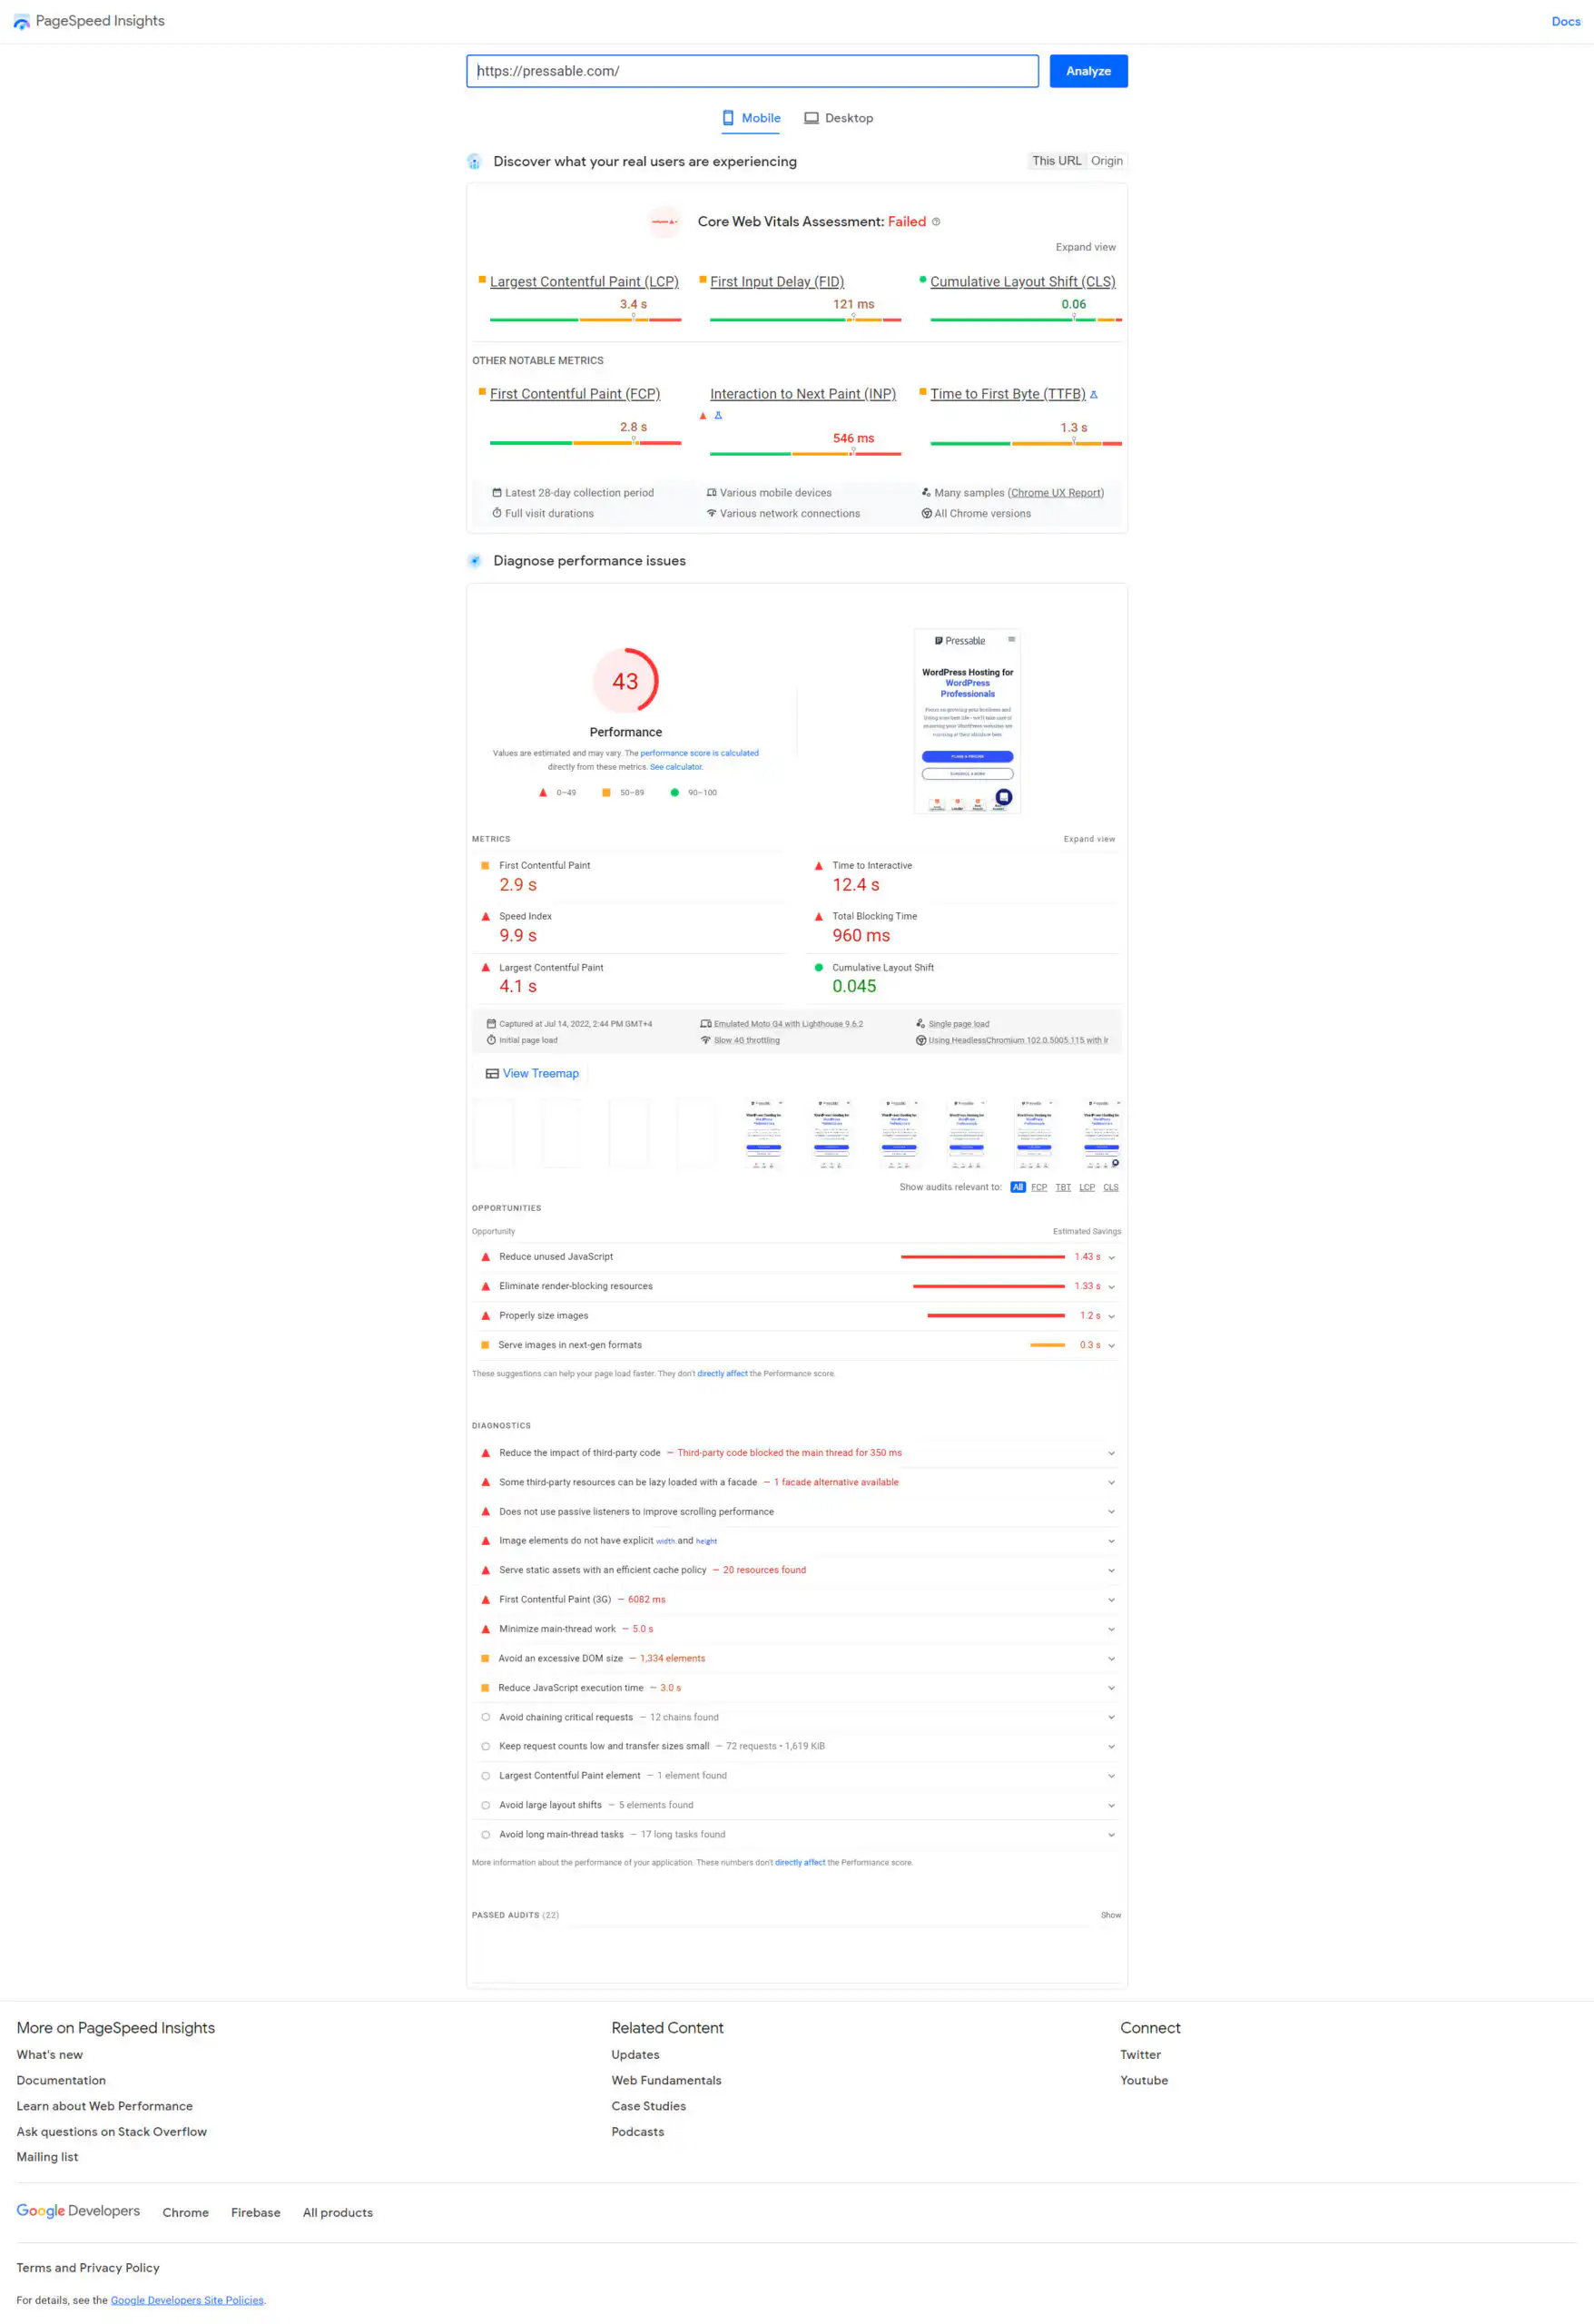
Oh, dear.
Suffice it to say I am surprised at the results. What this rather large image above shows is that currently pressable has a score of 43 for mobile and rather a lot of room for improvement. Perhaps they should reach out and we will show them how to do it 🙂 As you can see Google is very kind and gives you lots of suggestions that you can start working on to improve but let’s look at the Desktop results before we dive into what you do next.
Desktop Results:
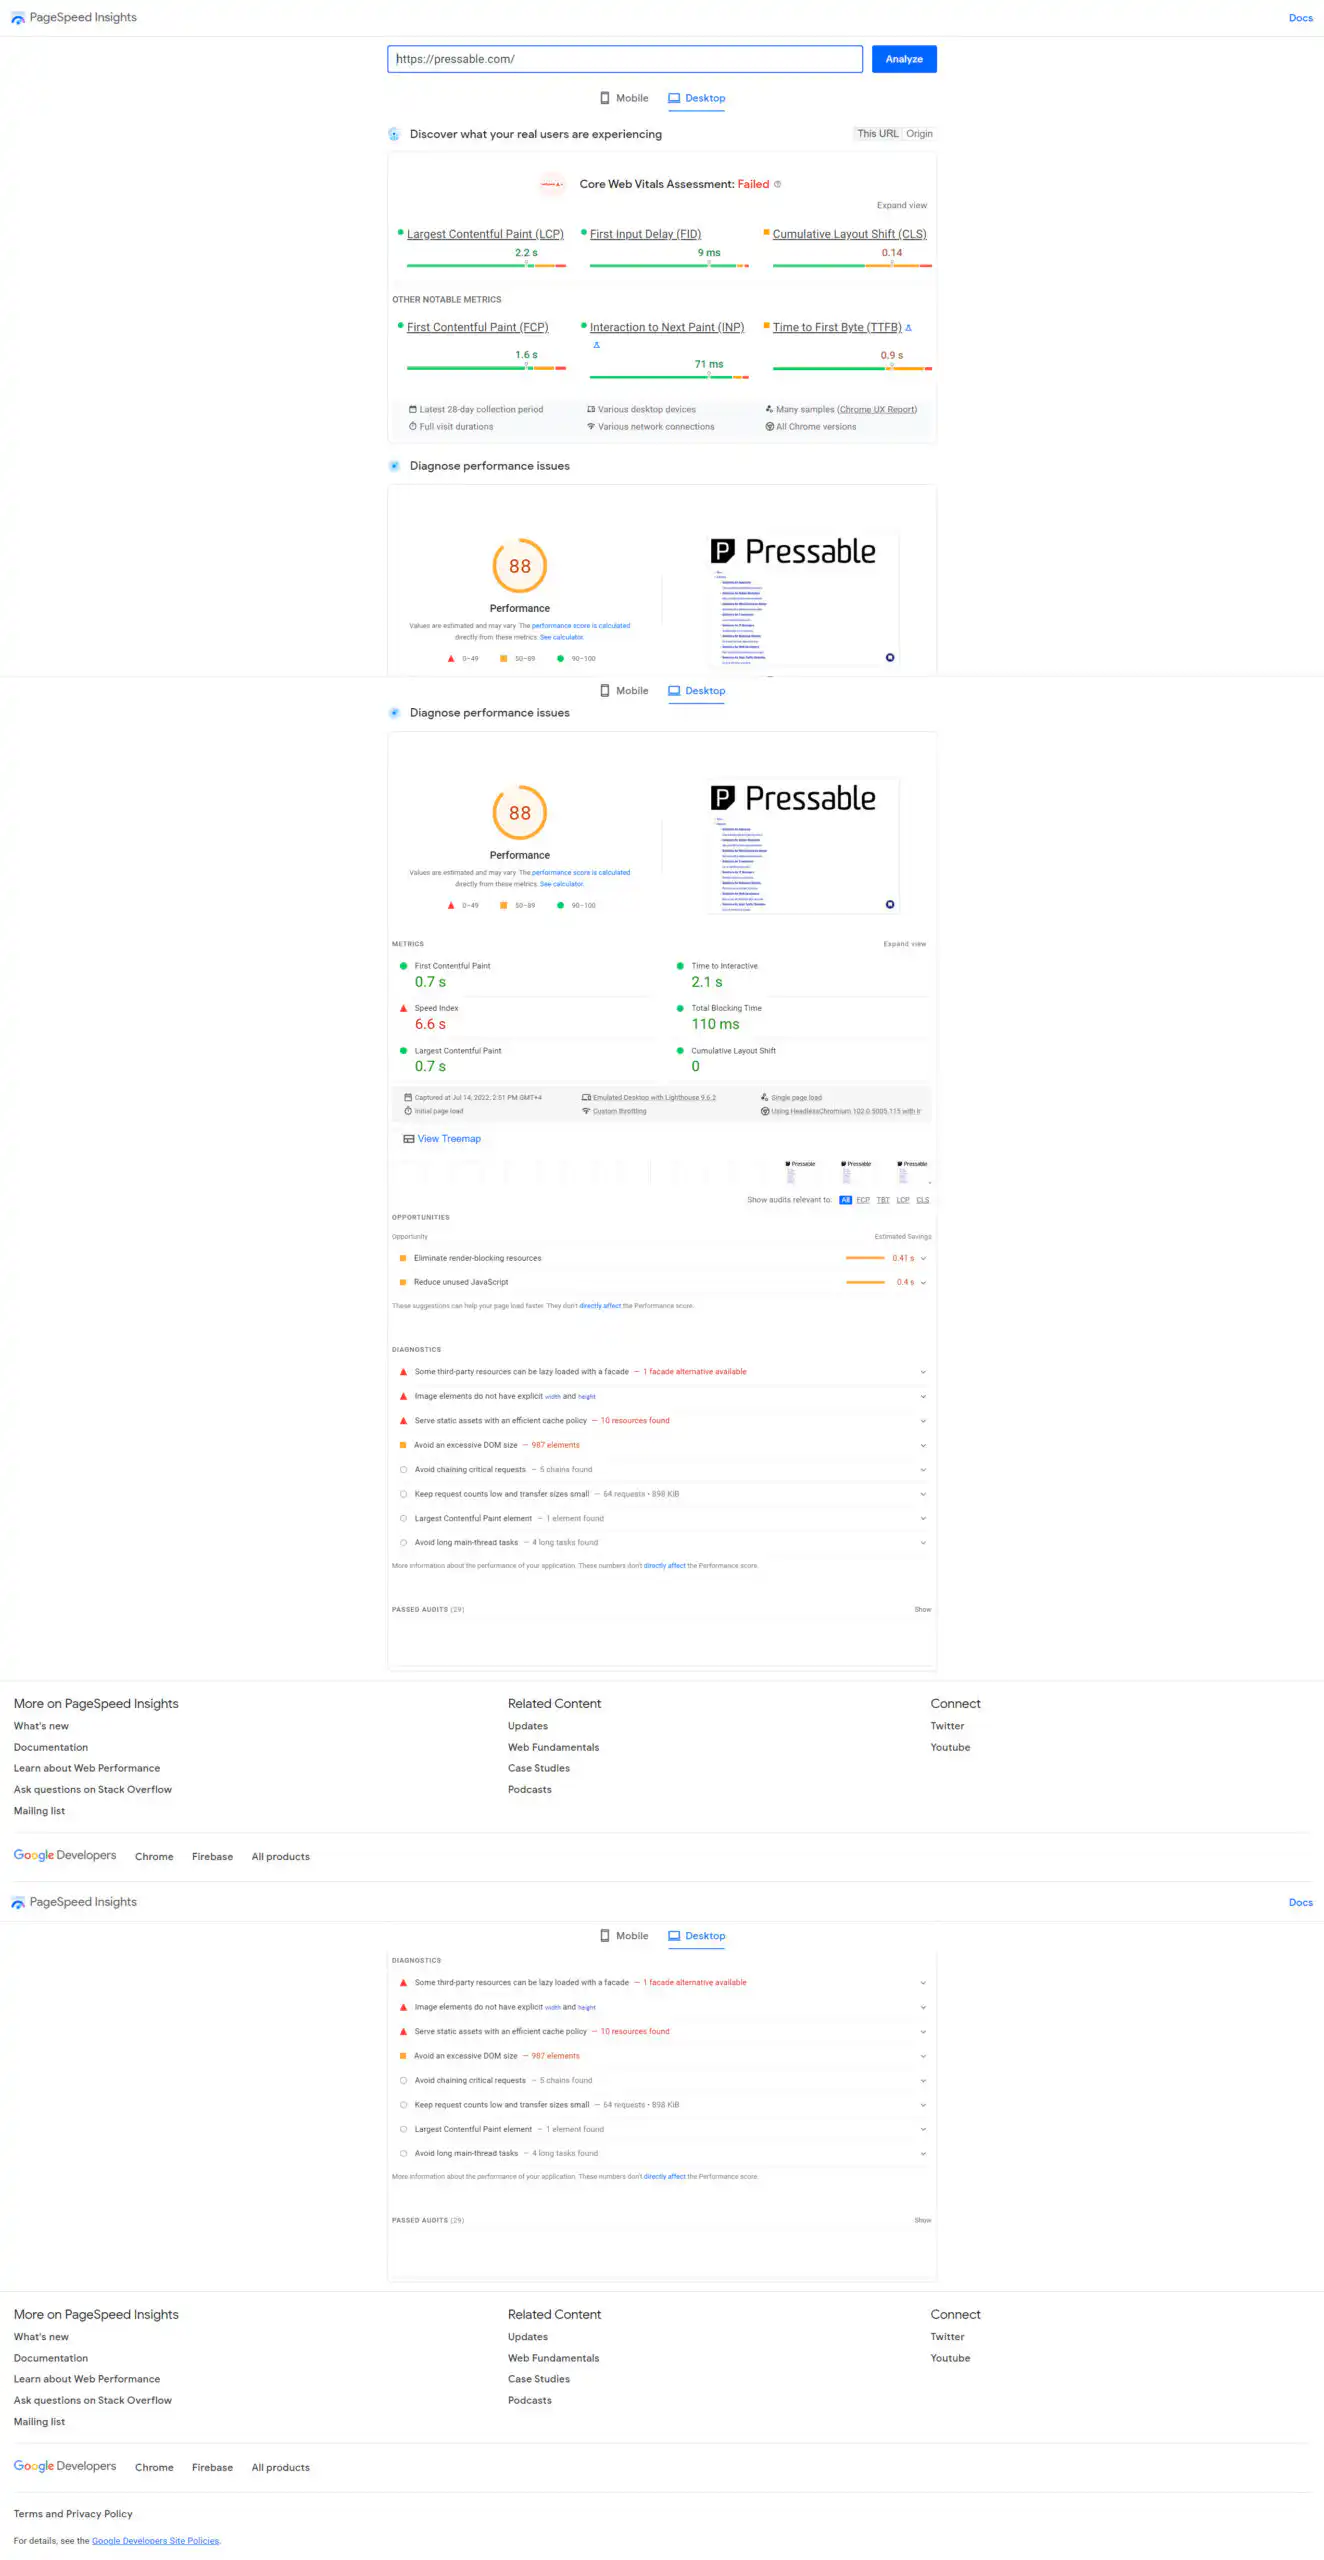
Their desktop score is much better (this is normal) but still not in the green so again room for improvement here. To be honest it is always mobile that will be the one to cause you problems when it comes to speed and performance. I find it ironic that Pressable has gone to the trouble of writing a blog post on this subject and not applying their suggestions.
Anyway, now you should have results for your website and also suggestions for what needs fixing. This is your benchmark so take some screenshots of these two scores so that you can refer back to them as you make changes and fixes and look to see your scores improve.
Improving Your Scores using the WP Rocket plugin
Now we need to set about improving what Google Page Speed insights have shown you. For this you are going to need:
- Admin access to your WordPress site (WPAdmin login)
- To download and install WP Rocket
- To download and install Imagify
- Access to your Web Host (FlyWheel, Siteground, Liquid Web etc)
- Access to your Domain Name registrar (Dotster, 123Reg, NameCheap, Fasthosts etc)
- An Account with Cloudflare
- Some technical knowledge
Yes, this is not something that you can do if you’re not technical because what I am going to start showing you next involves making many changes and also testing. This is a guide that you can give to your web developer though and work through it with them.
So first things first let’s get WP Rocket Plugin installed and an initial setup done.
Installing WP Rocket Plugin
If you know WordPress this is pretty simple to do. You cannot download WP Rocket Plugin from within plugins inside WordPress you have to go Here and download it and then upload it to WordPress. No, it’s not FREE to use. You also have to buy it. We have an agency license so anyone hosting with us gets it for free along with a few other premium plugins that we use.
Once you have downloaded it you’ll need to follow this path
Log in to WordPress Admin
Press Plugins on the left-hand side
Press “Add New” at the top
Press Upload plugin
Select choose file and choose WP Rocket Plugin from where you saved it when you downloaded it
Select install now and let it install
Then finally click on Activate to activate the plugin
You should now have WP Rocket sitting in your plugins list and be ready to click on settings so you can configure it, but before you do that I want you to get set up with a few other bits and pieces first.
Installing Imagify
We use Imagify to optimise our images in our Media library. Images are a major cause of slow load times for websites just because of their size so it is imperative if you want to improve performance that you optimise them all. So let’s head over here and download imagify. Imagify has a web version where you have an account and optimise images in the web interface and also a WordPress plugin. For our purposes, we are going to download and install the WordPress plugin as we did with WP Rocket.
So same steps again.
Log in to WordPress Admin
Press Plugins on the left-hand side
Press “Add New” at the top
Press Upload plugin
Select choose file and choose Imagify Plugin from where you saved it when you downloaded it
Select install now and let it install
Then finally click on Activate to activate the plugin
Once imagify is installed and activated you need to set it up and optimise your media library.

You can pretty much copy our settings here. Of course, your folders for optimisation might be different to ours unless you’re also using Divi. Once you have set these you can save and go to the bulk optimiser.
Bulk Optimisation
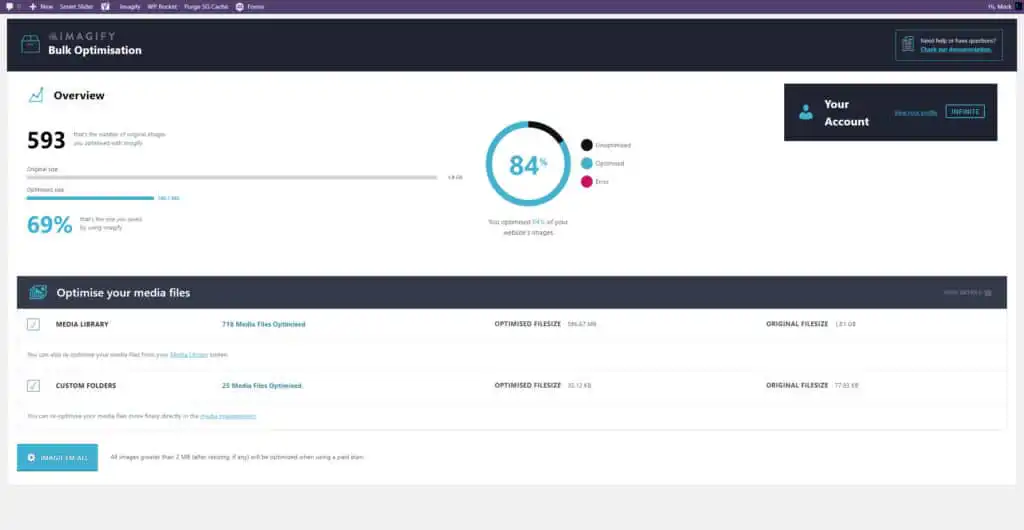
Select in settings to go to Bulk Optimisation and you’ll end up here. Select your media library and any custom folders and press Imagify em all. You can also imagify individual images from within your media library if you wish.
All done? Great. You now have WP Rocket Plugin installed and also Imagify and you have Imagified all your images. Your images will now also serve in WebP format. Now we can move on to setting up WP Rocket and the optimising phase.
Setting up WP Rocket
There are two ways that you can access the settings of WP Rocket.
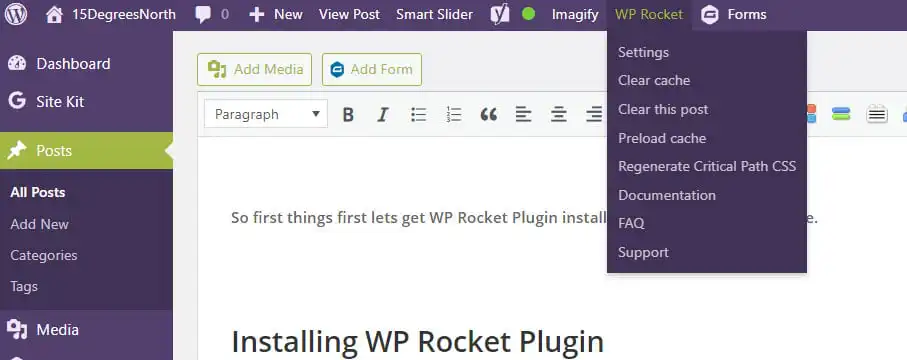
At the top of WordPress, you will see a WP Rocket icon. Click on this and a drop-down menu will appear where you can select settings.
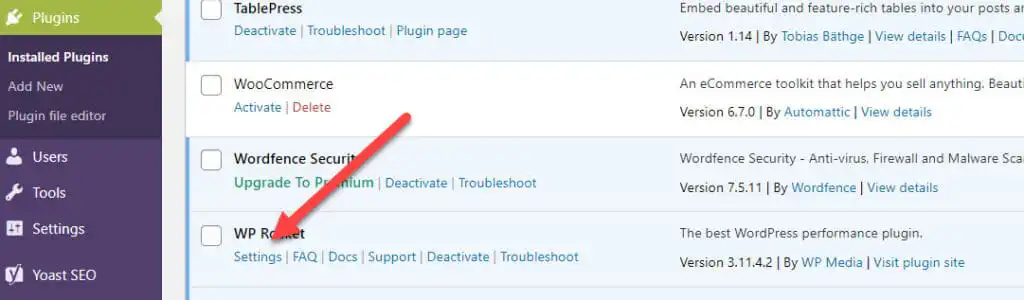
In the left-hand pane, you can select plugins scroll until you see WP Rocket and then select settings.
Once you load up settings you’ll see this screen.

I’m now going to walk you through each setting here and as we go through each one we will set up Cloudflare and Imagify as needed. On this entry page, you don’t need to do anything. It just shows you your license status. As you can see we have an agency license and we are not using Rocket CDN. We are not at this time using any paid CDN for our content delivery. It is optional and there are many CDNs to choose from including the one here from WP Rocket themselves. If you can achieve good performance figures without using one as we have then great do that.
Cache
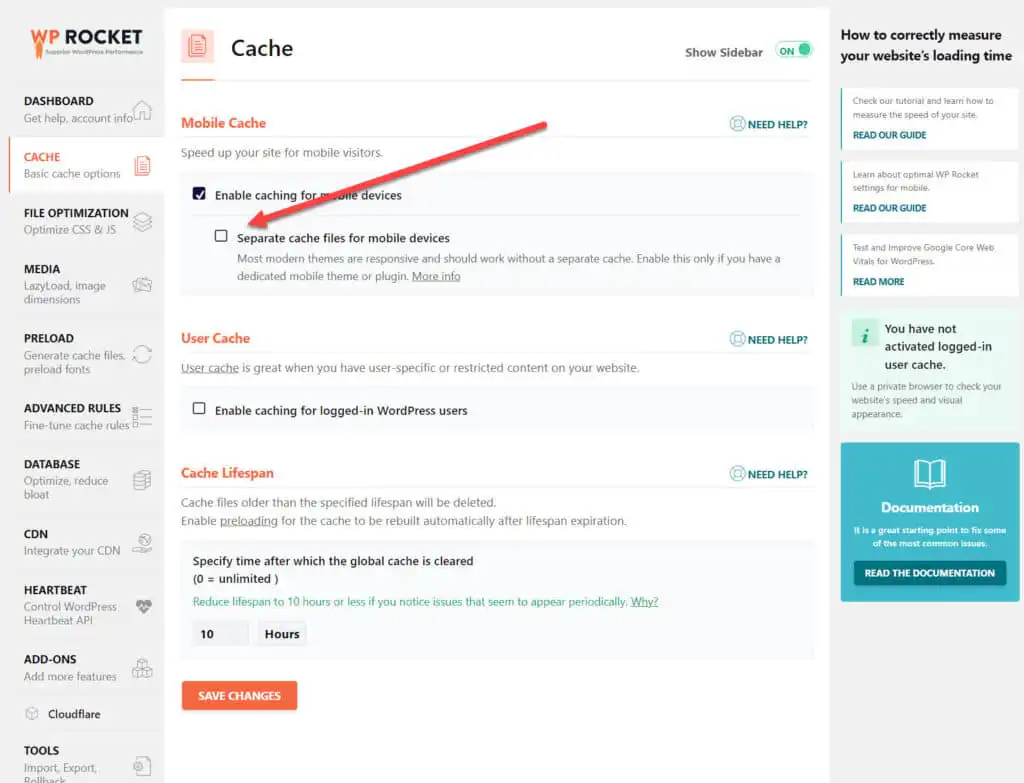
Mobile Cache
As you can see here we are NOT using a separate cache for mobile. WP Rocket have a very comprehensive guide on this feature so I’m not going to rehash it here. Essentially it is dependent on what type of theme you’re using and also if you are using NGINX on your server (We Are).
User Cache
Logged-in user cache is useful when you have a membership site, or similar when users must log in to see the content. As we don’t on this site we left it unchecked.
Cache Lifespan
Set lifespan to 10 hours
File Optimisation
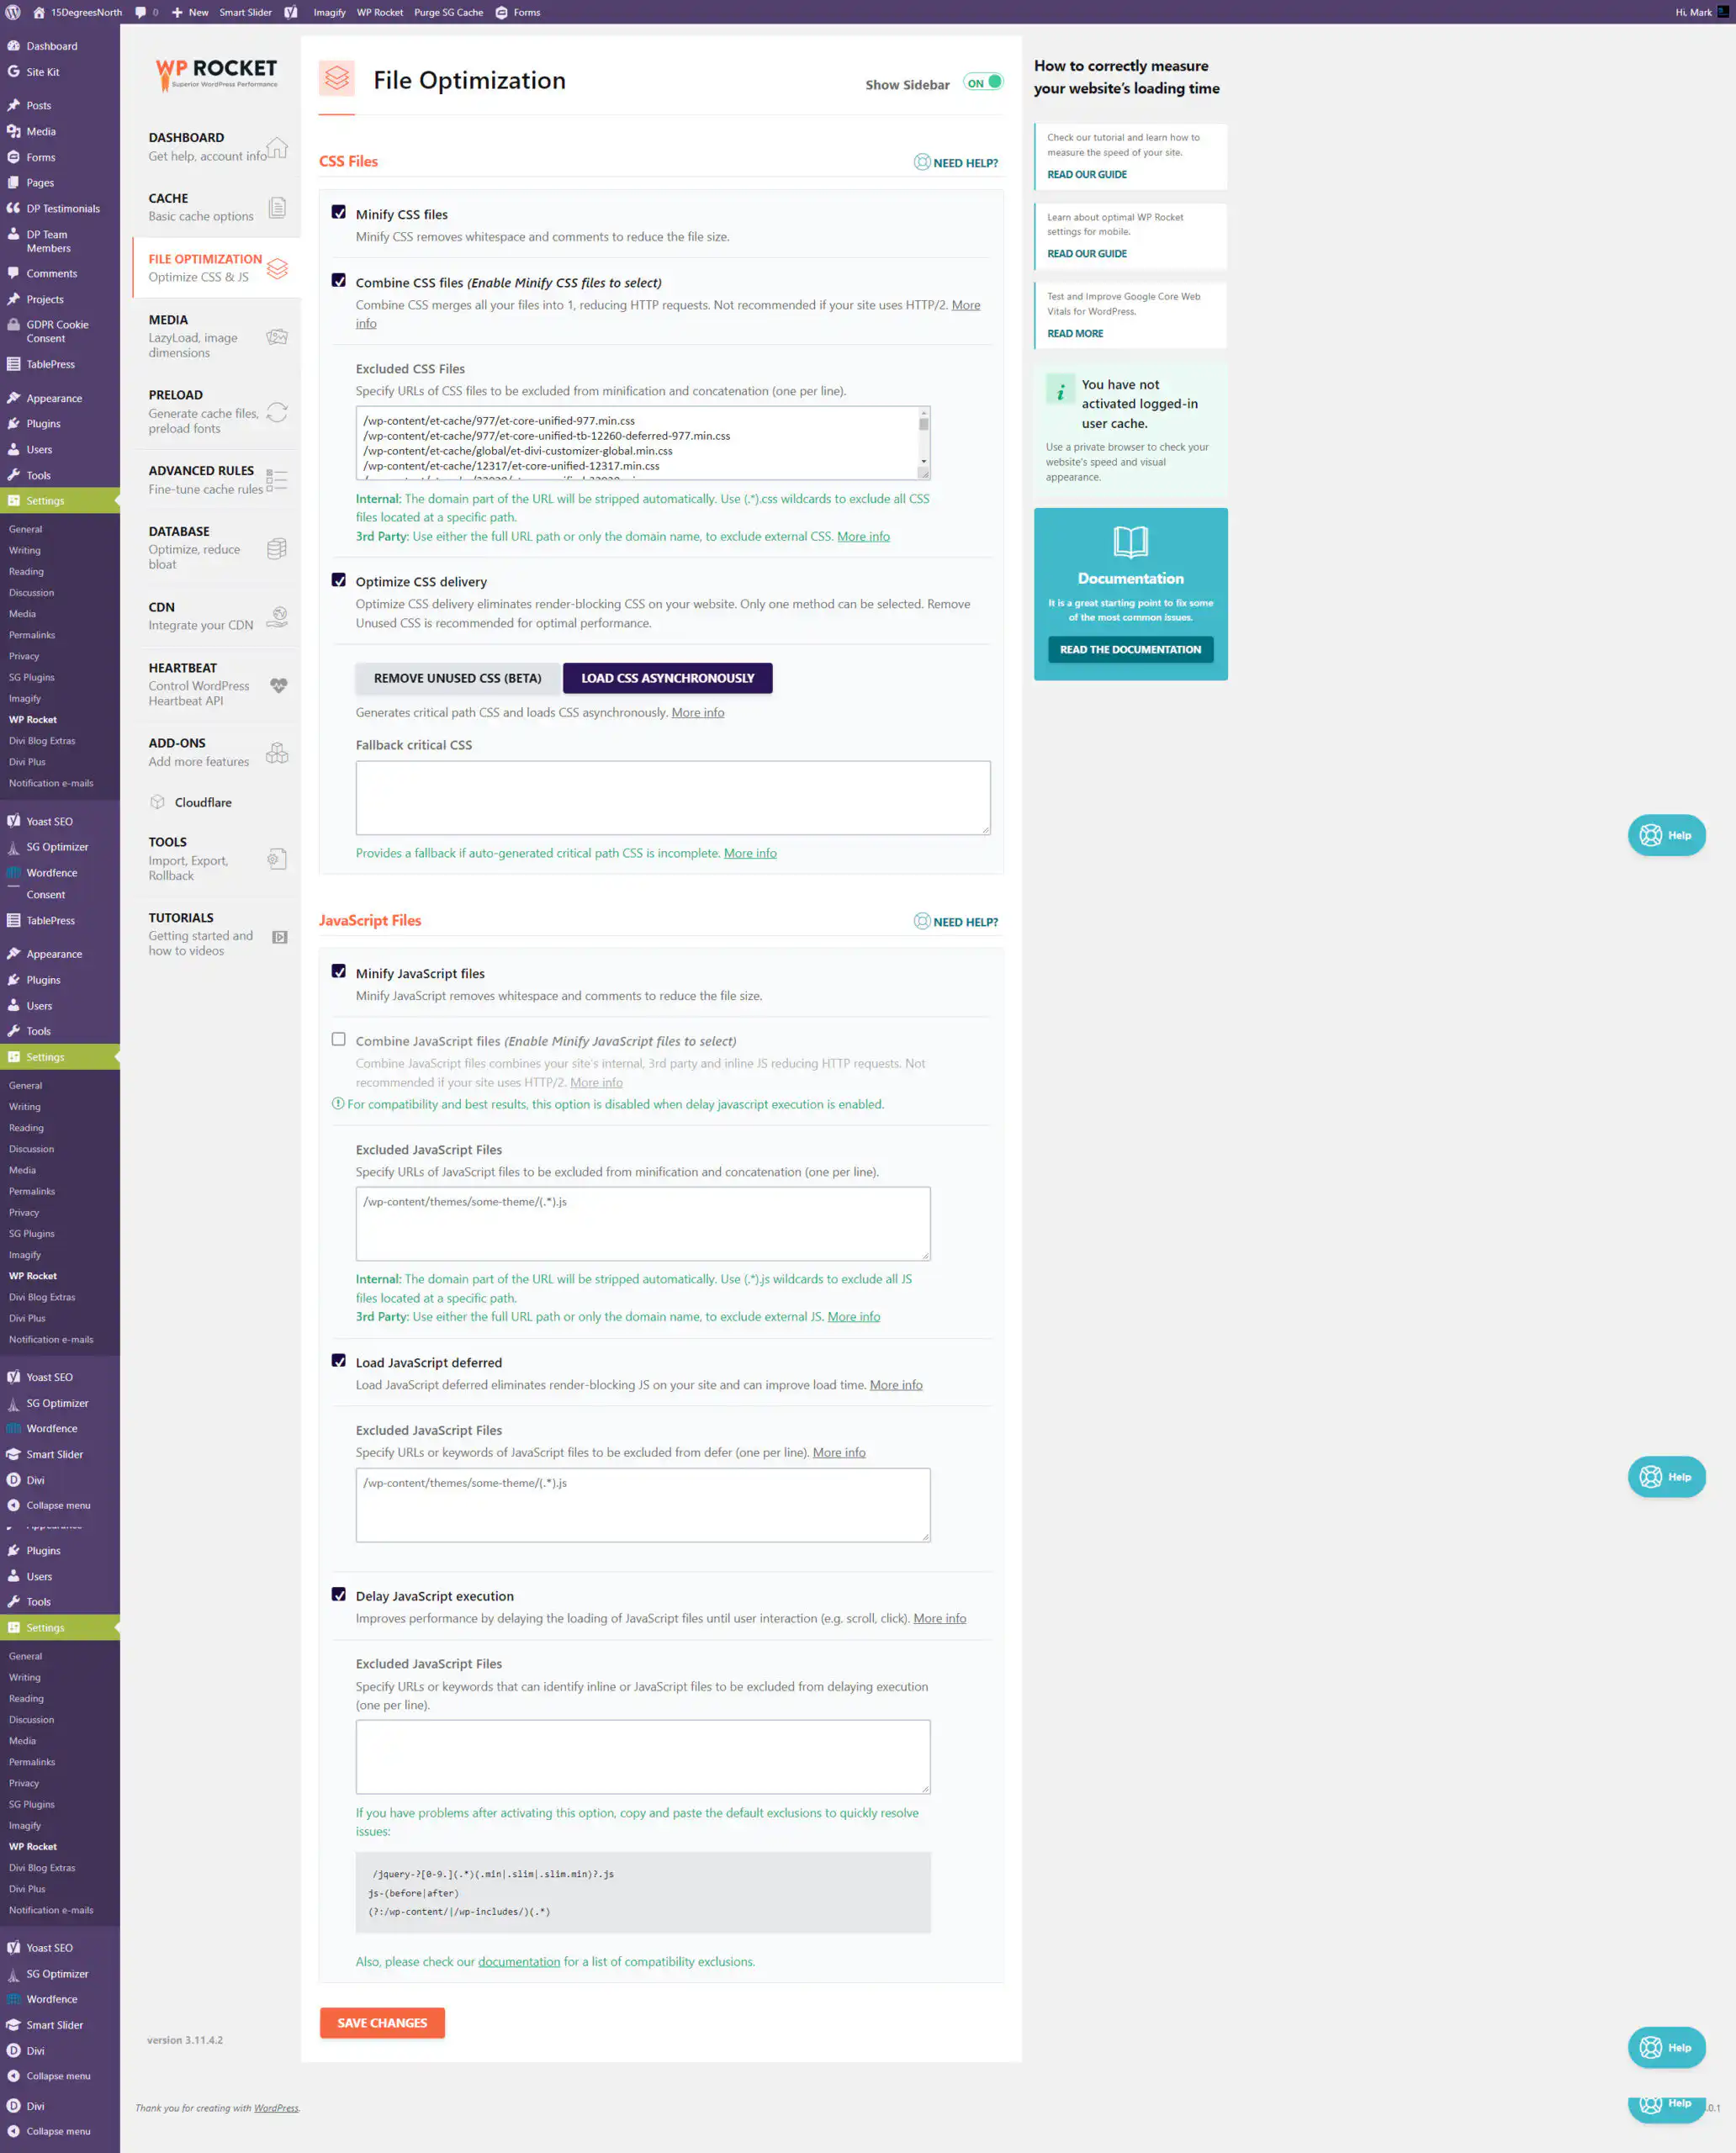
The file optimisation screen is where we start to get technical and if you are NOT technical you need to find someone that is to help you out here. All of these settings can break your site. You have to play around with them until you find the sweet spot. As you can see we have excluded a few CSS files from being minified. What you can do here is activate each setting and then test your site on desktop and also mobile to see if it still works or if all or part of it is broken or not aligned. To be honest for this page you do need to be working with your web developer to get the best out of it. Either that or go through the guides and test test test as you make changes.
A note on Delay Javascript. If you run a slider above the fold (At the top) it might stop working if you enable delay Javascript.
Media
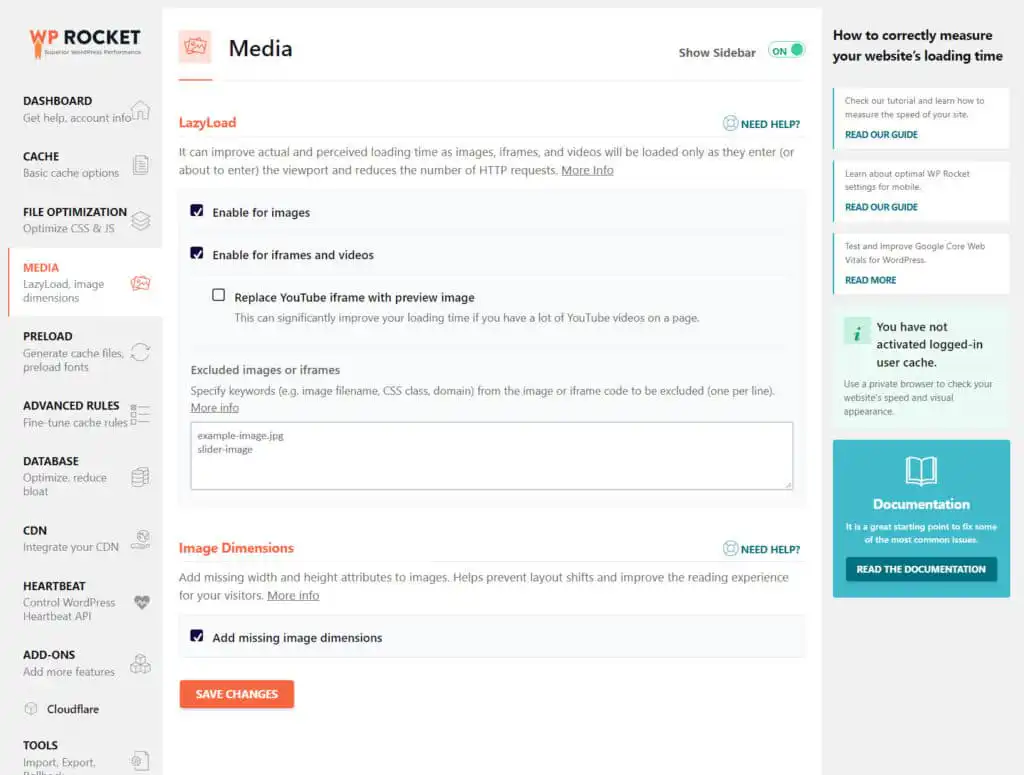
For media, you can just follow our settings above. If you do have a lot of YouTube videos (we don’t) you can check that one.
Pre-Load
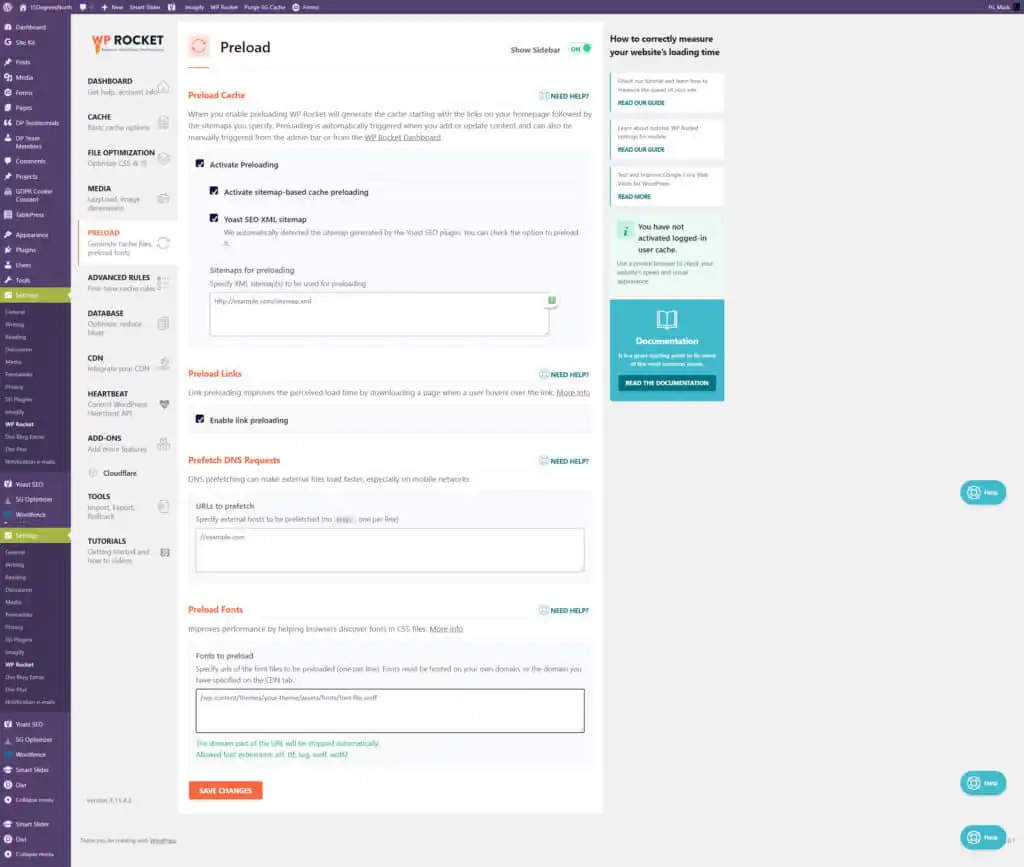
Pre Load is pretty straightforward to set up and again you can just copy our settings here. We are running Yoast premium and so we get the option to pre-load from our sitemap which we have ticked. It is a very good idea to Pre Load your fonts. We use Google fonts for the whole site and are pre-loading them from the DiVi theme itself.
Advanced Rules
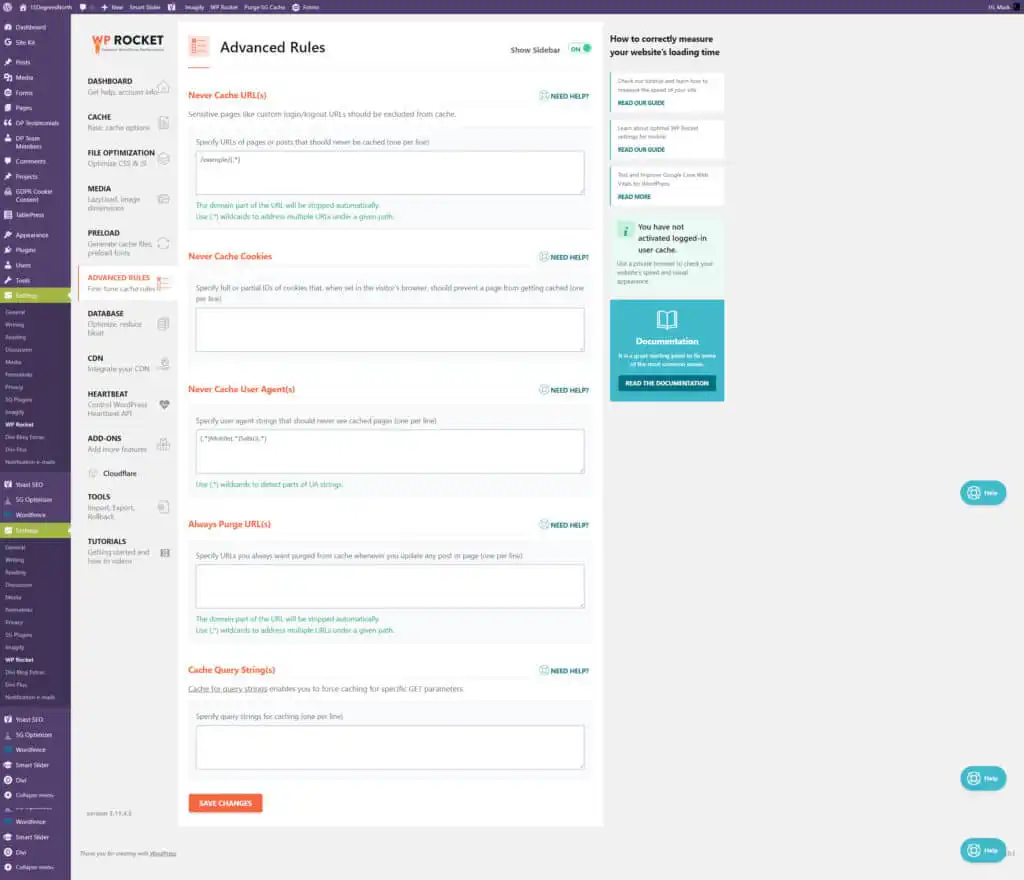
We are not using any of these settings but again it depends on the site in question. The Never Cache Cookies option in WP Rocket is often used when the items in the cart are updated with PHP code. To prevent the wrong display of the number/price of the items it is possible to exclude pages from caching when an item is added to a cart (i.e. a cookie is set by an e-commerce plugin/widget).
Generally for all of these settings, you should refer to WP Rockets guide and decide for yourself if it is worthwhile enabling these options or not.
Database
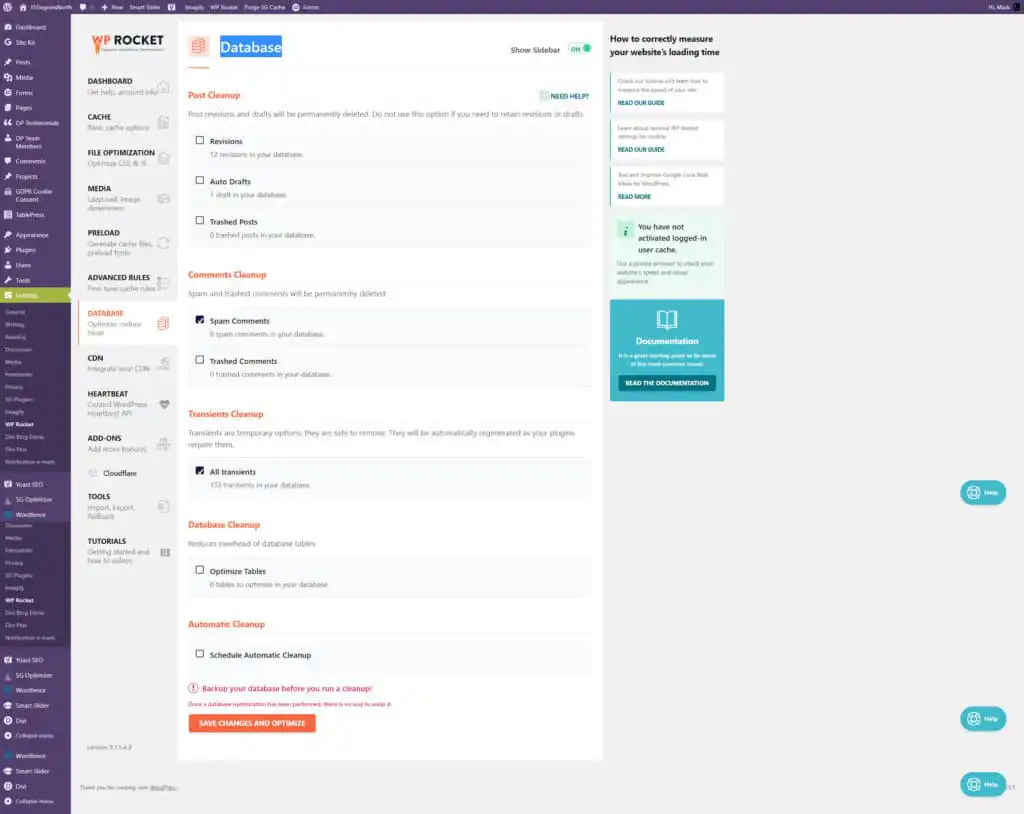
This section allows you to tidy up your WordPress database. A clean and tidy database is a fast-loading database. As with all things WordPress do take a backup before running these options in here just in case you break something.
CDN
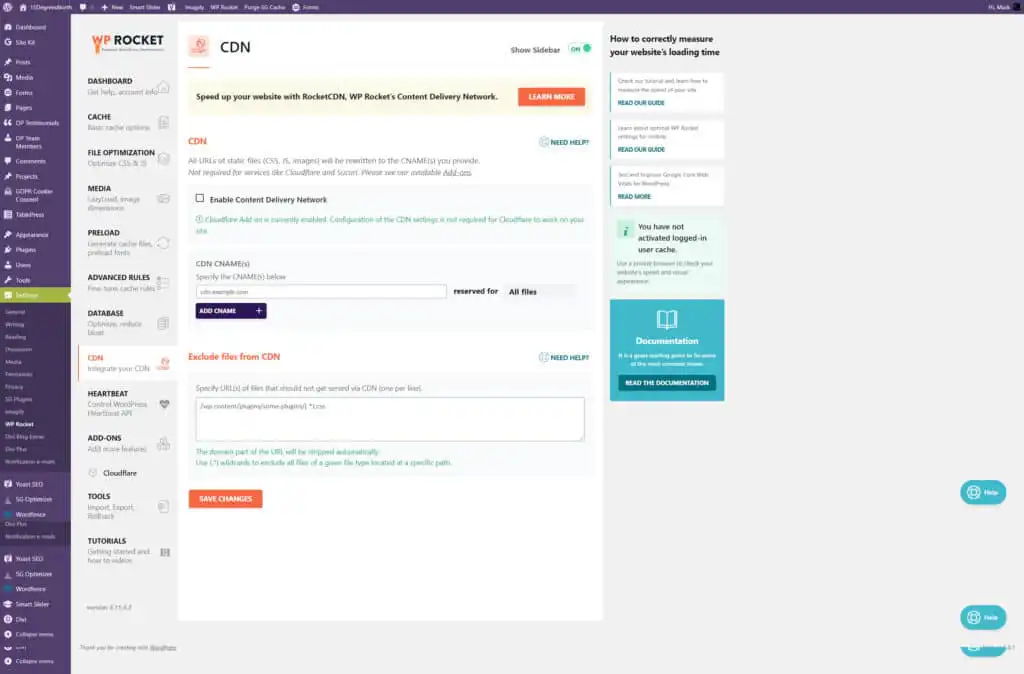
A CDN (content delivery network). It can also be called a content distribution network is a group of geographically distributed and interconnected servers. CDNs provide cached internet content from a network location closest to the user to speed up content delivery. We use CloudFlare as our CDN partner and so we did not set this section up.
Heartbeat
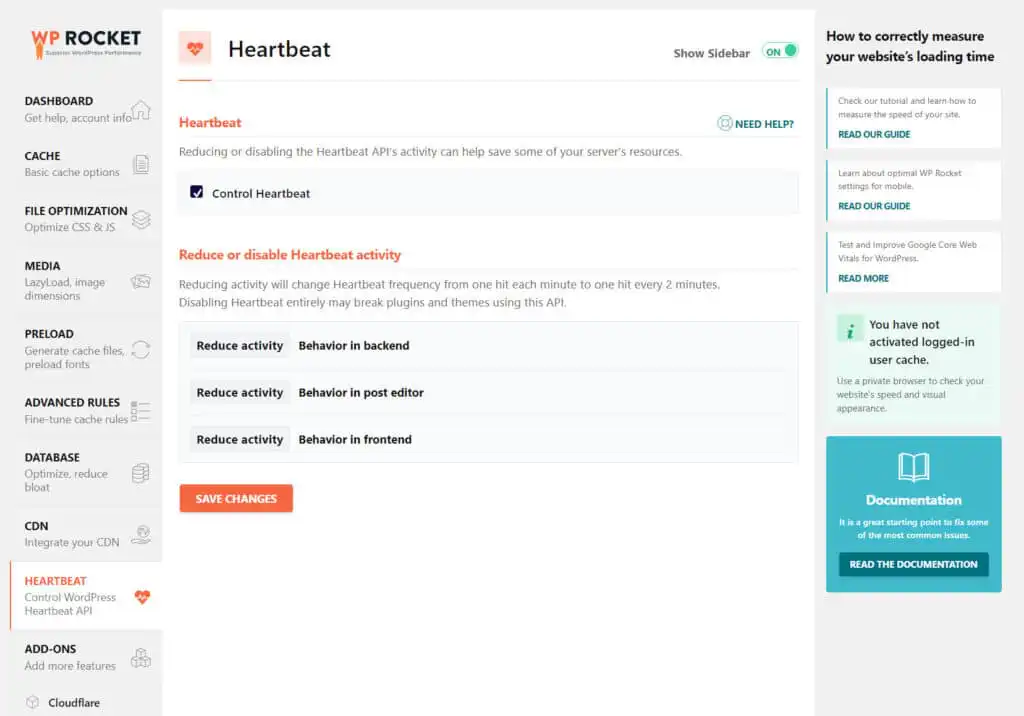
For Heartbeat, you can use our settings above.
Add-ons

Add Ons are a bit more complex because they are server specific. When we work with a client to improve their performance we check their server to see which of these is installed and then again we test them to make sure they work. For us, we have the Cloudflare add-on enabled which we will run through next. You can see that WP Rocket picks up that we are also using the Imagify plugin so we don’t enable Webp compatibility because Imagify is set to serve our Images in Webp format.
Cloudflare
We use CloudFlare for our CDN as stated before so I’m now going to run through how you go to Cloudflare create an account and link that account to WP Rocket. The next section is only if you wish to use Cloudflare as your CDN.
Setup Cloudflare Account
Head on over to Cloudflare here and create a FREE account.
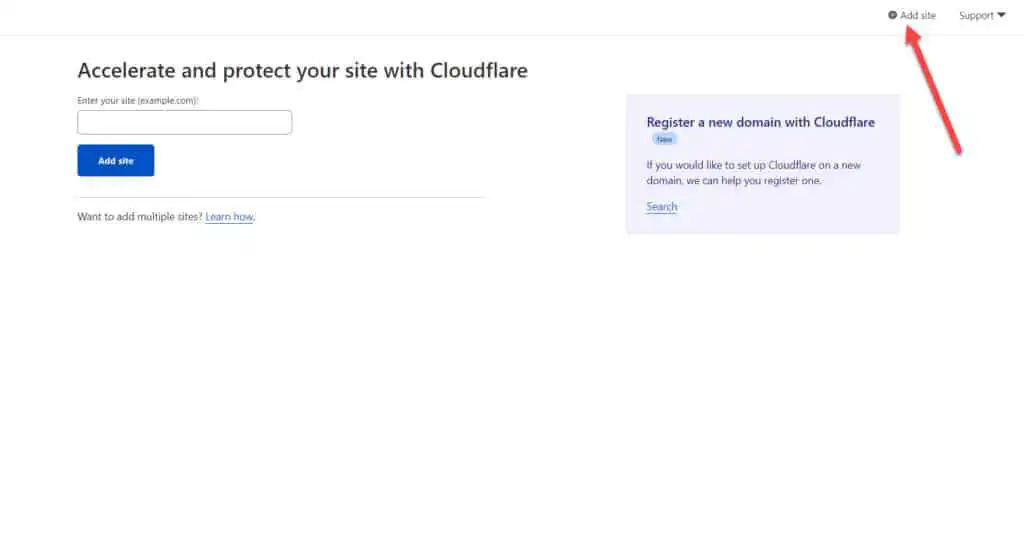
Once you have created your account you need to go to the dashboard and add your site. Cloudflare will now scan for your current DNS settings and once it is done you will see a page like this.
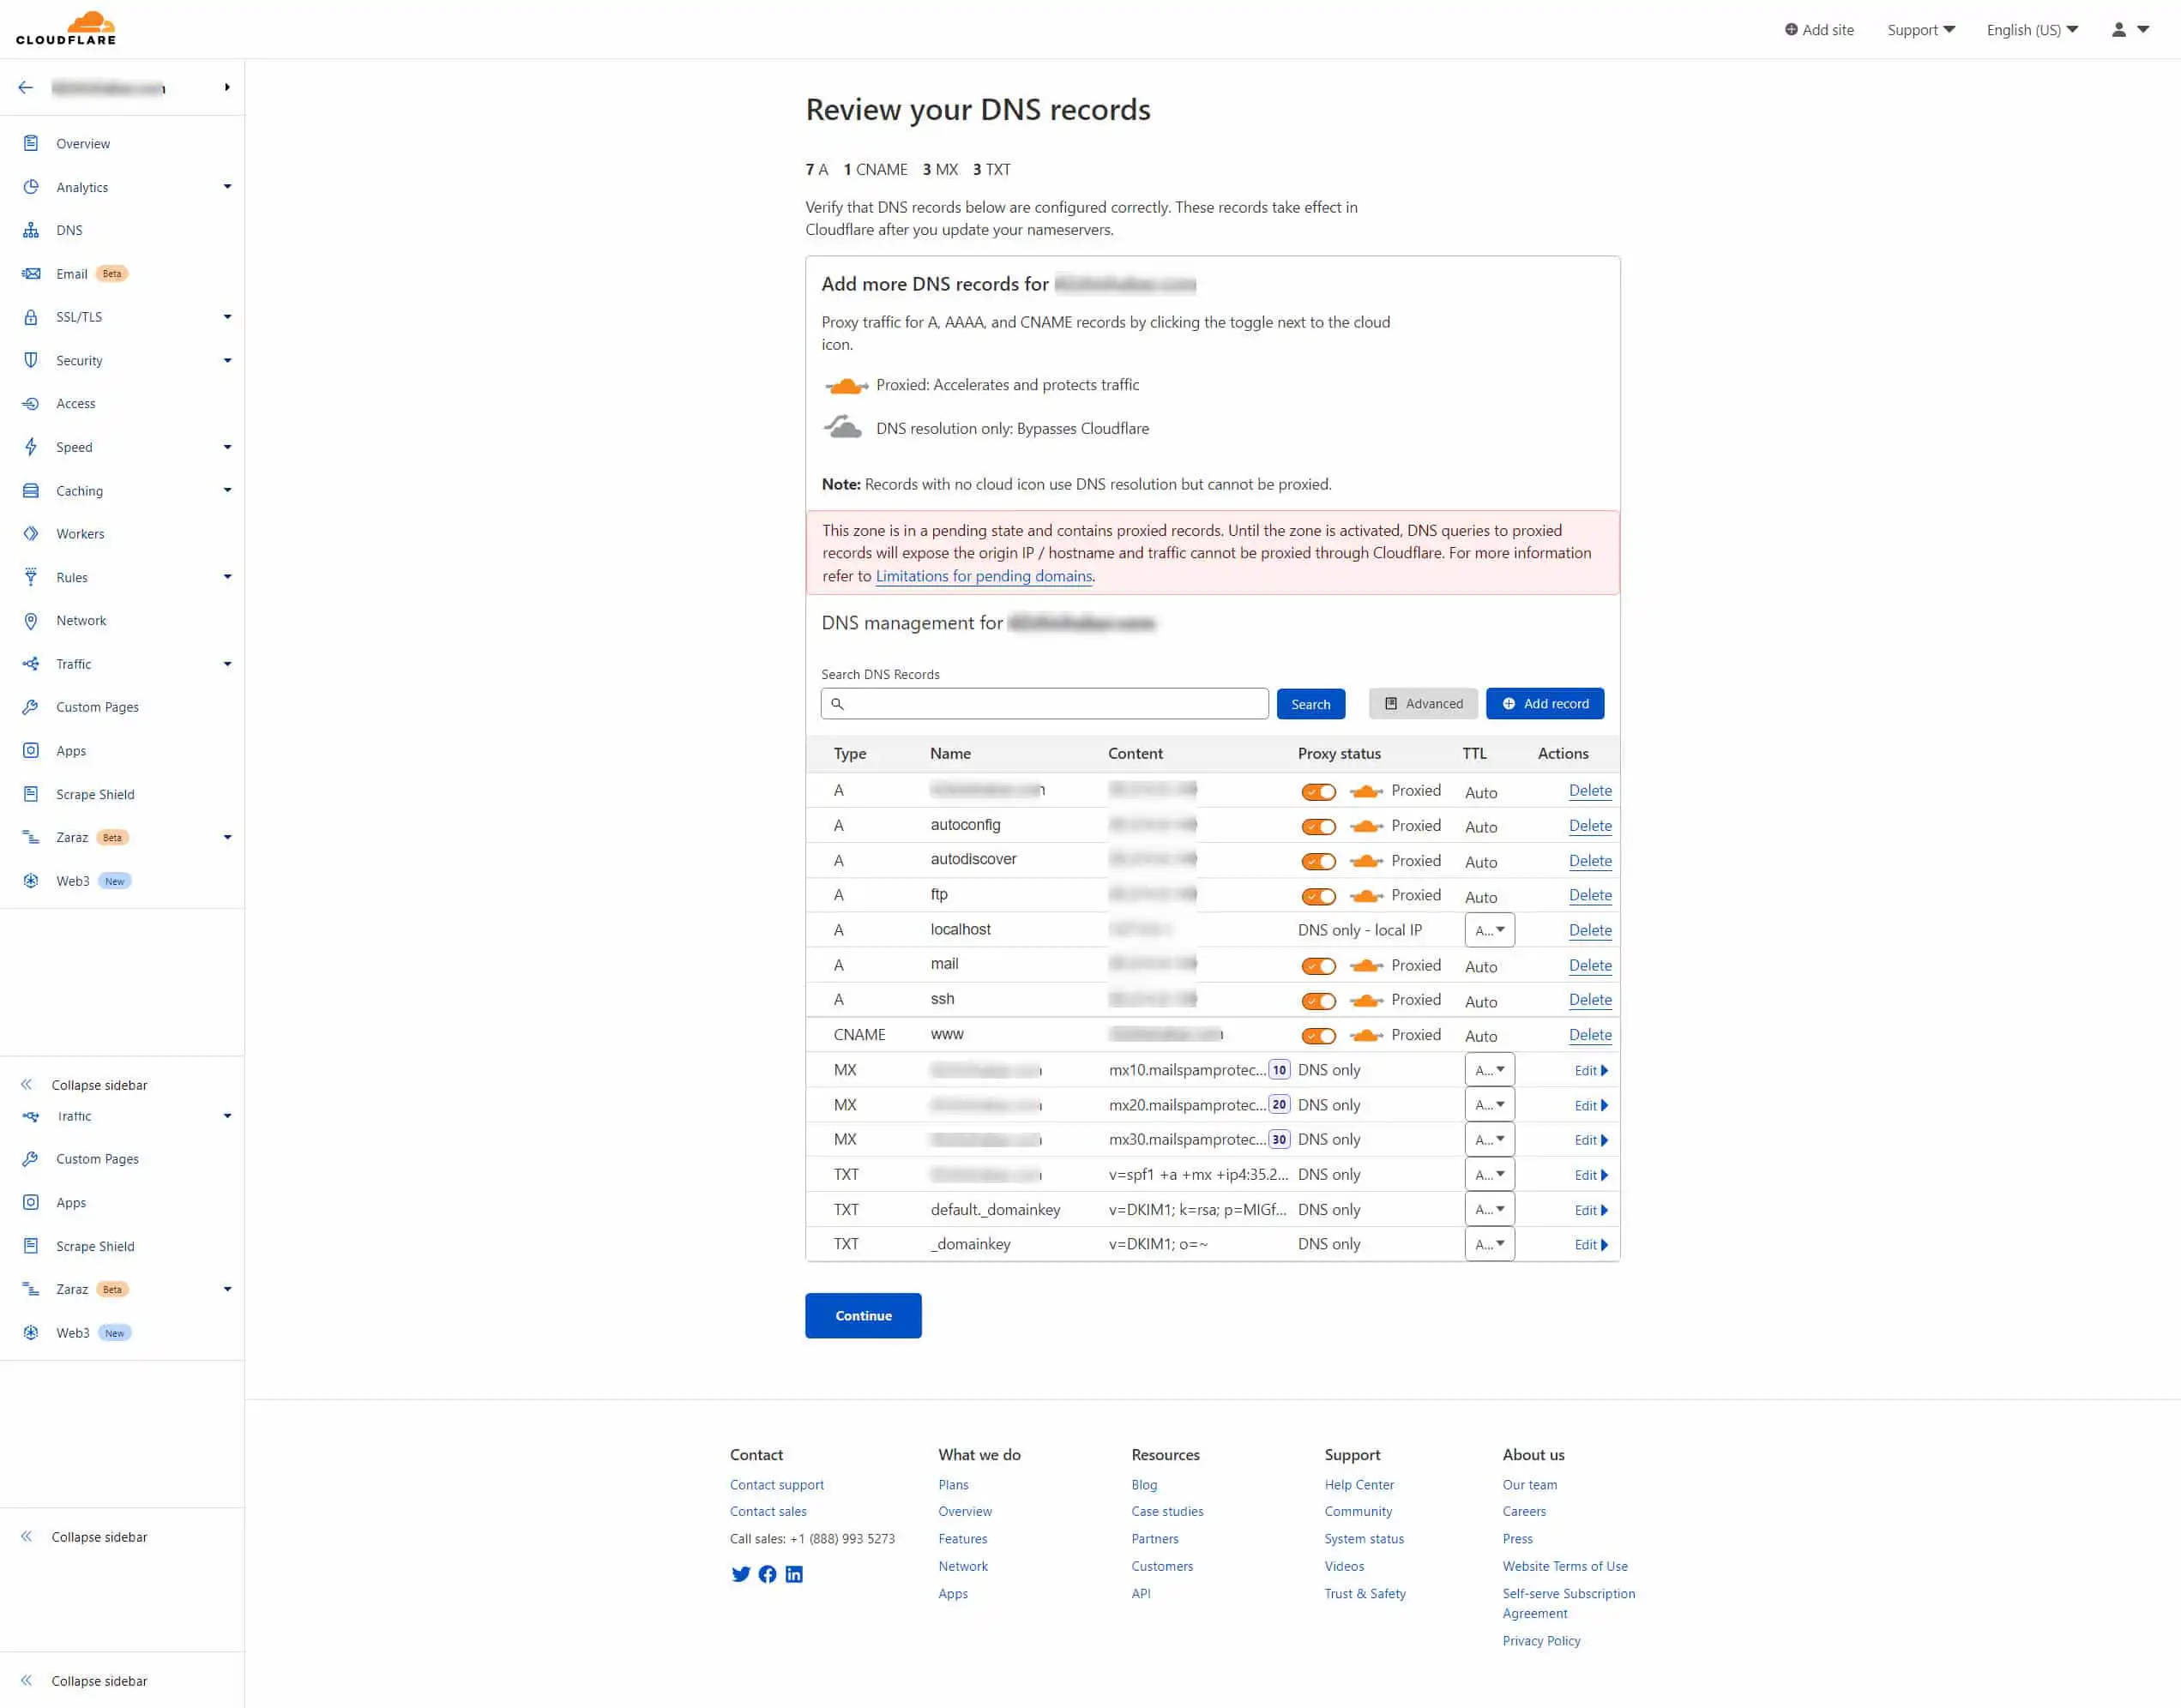
Press Continue and you will jump to the Change Nameservers page.
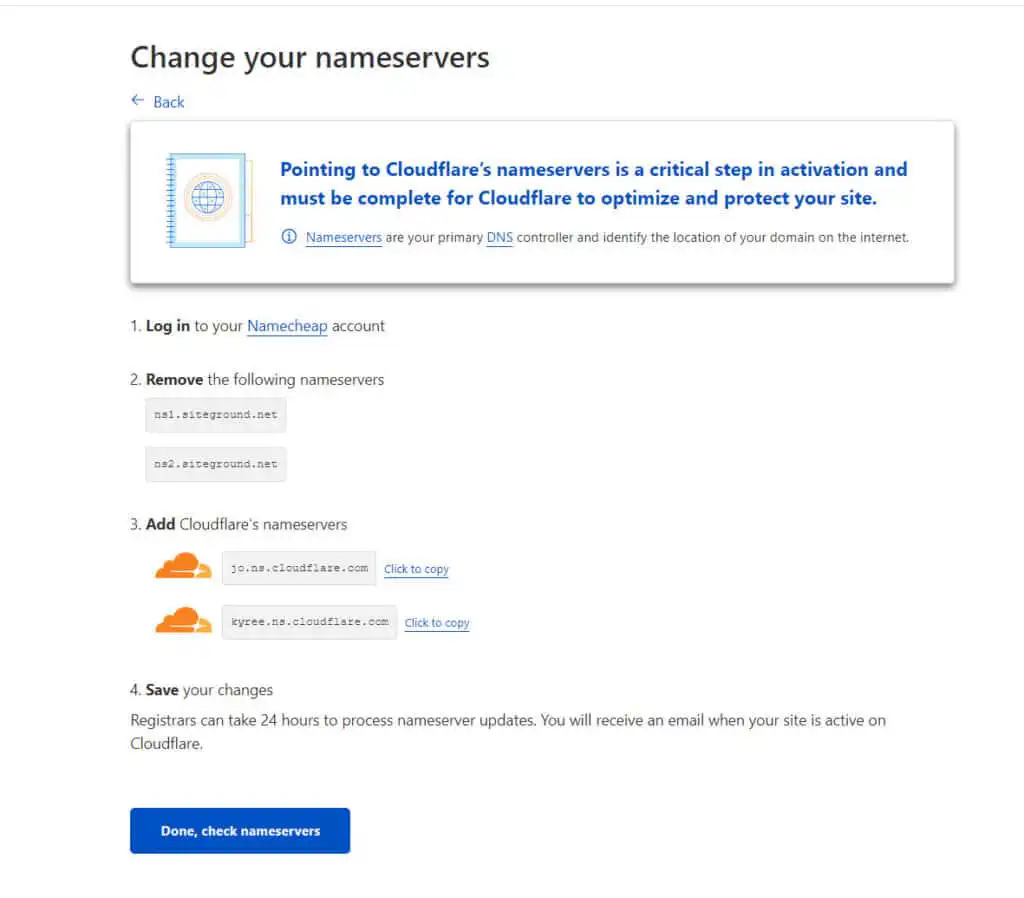
The steps here are.
- Login to your Domain Name registrar. As you can see from our example site this is NameCheap.
- Once inside your registrar’s admin panel locate your domain name (If You have more than one domain registered with them)
- Find the section to update nameservers
- Replace the two nameservers with the two that Cloudflare wants you to use
- Add them and hit save
That’s it. You now need to wait until the nameserver change propagates out over the internet which can take several hours. You can click on the button “done check nameservers” and if they have changed Cloudflare will jump to an auto menu to set some optimal settings. Just follow its recommendations here.
Cloudflare Menu
Once you have added your site, changed over nameservers and checked them as being ok you will get a dashboard and tons of menu options down the left-hand side of the page.
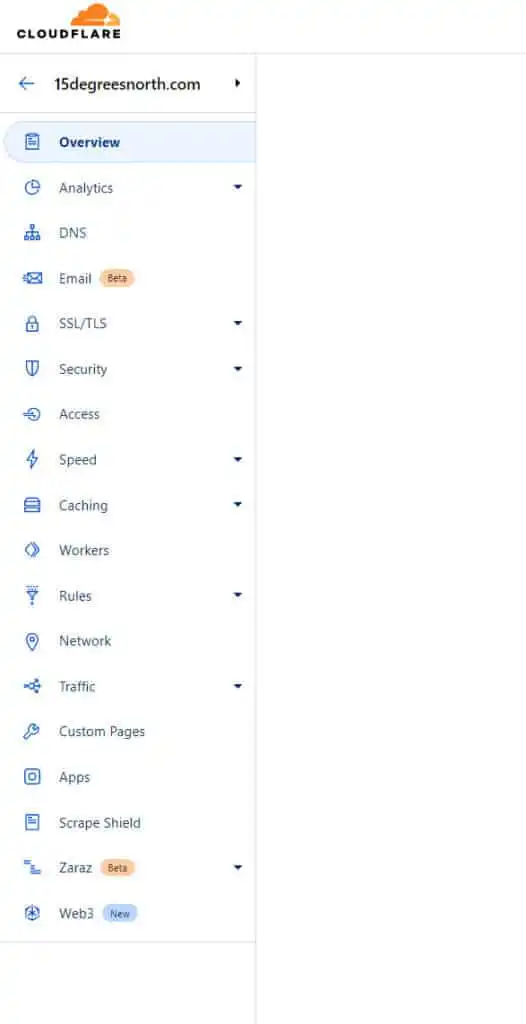
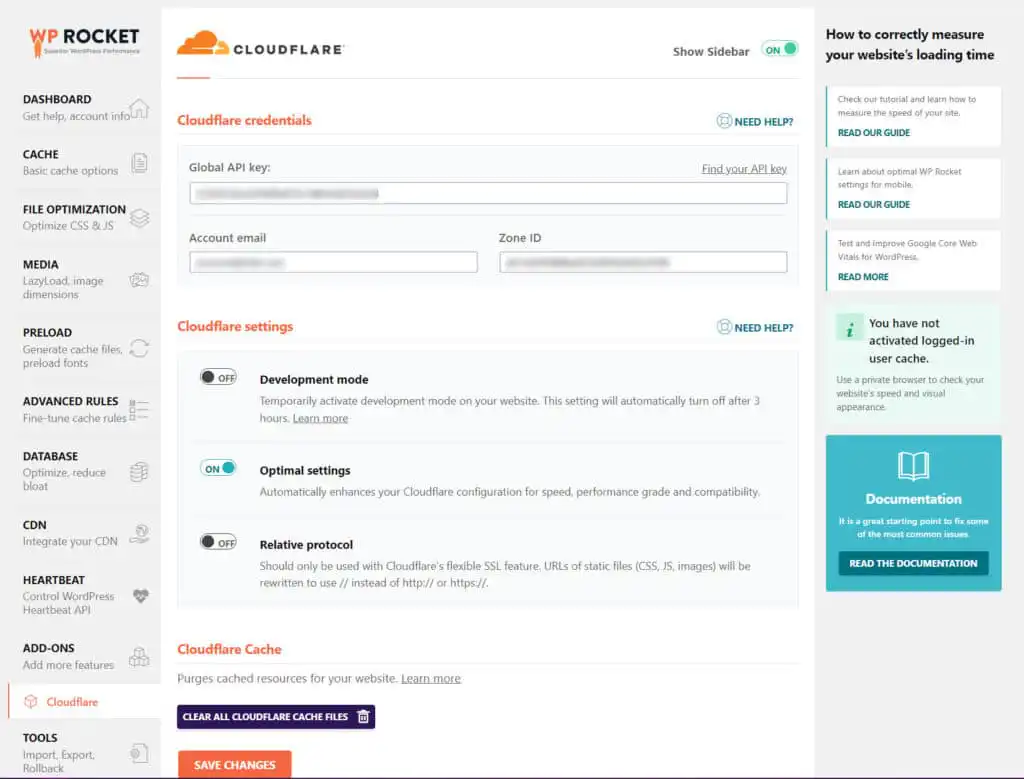
For the time being, you can leave these menu items alone. We are now going to jump back to WP Rocket and link Cloudflare and check the button for optimal settings.
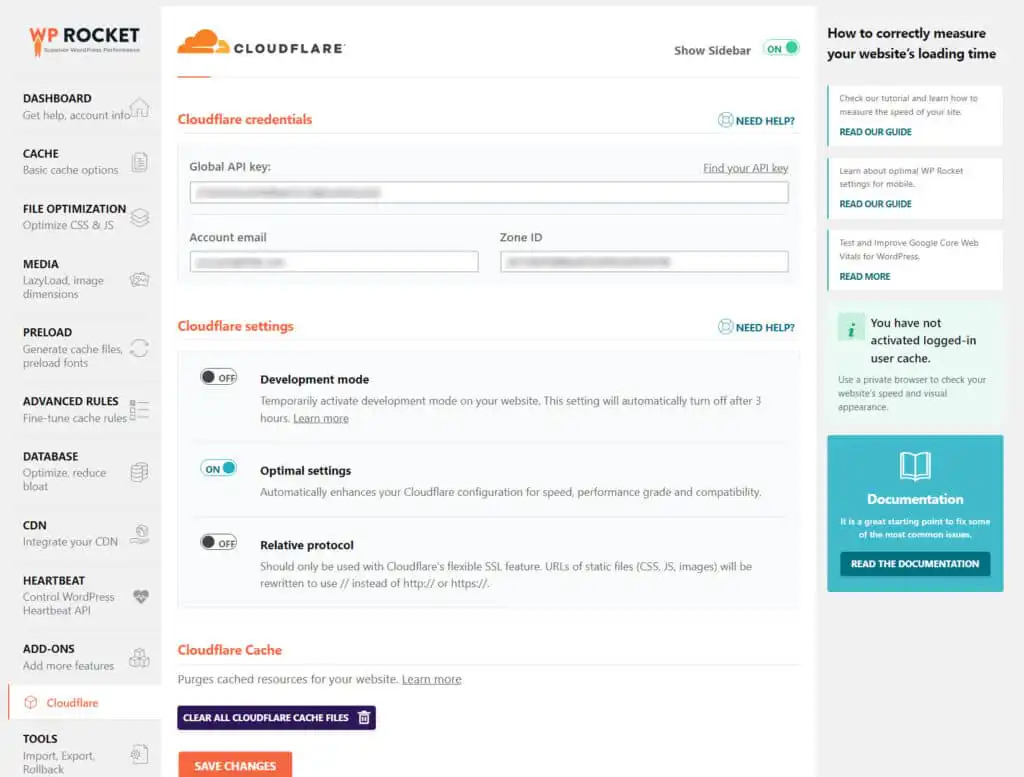
On this page we need to add in:
- Your Cloudflare Global API key
- Your account email for Cloudflare
- Your Cloudflare Zone ID
You can find these here:
Global API
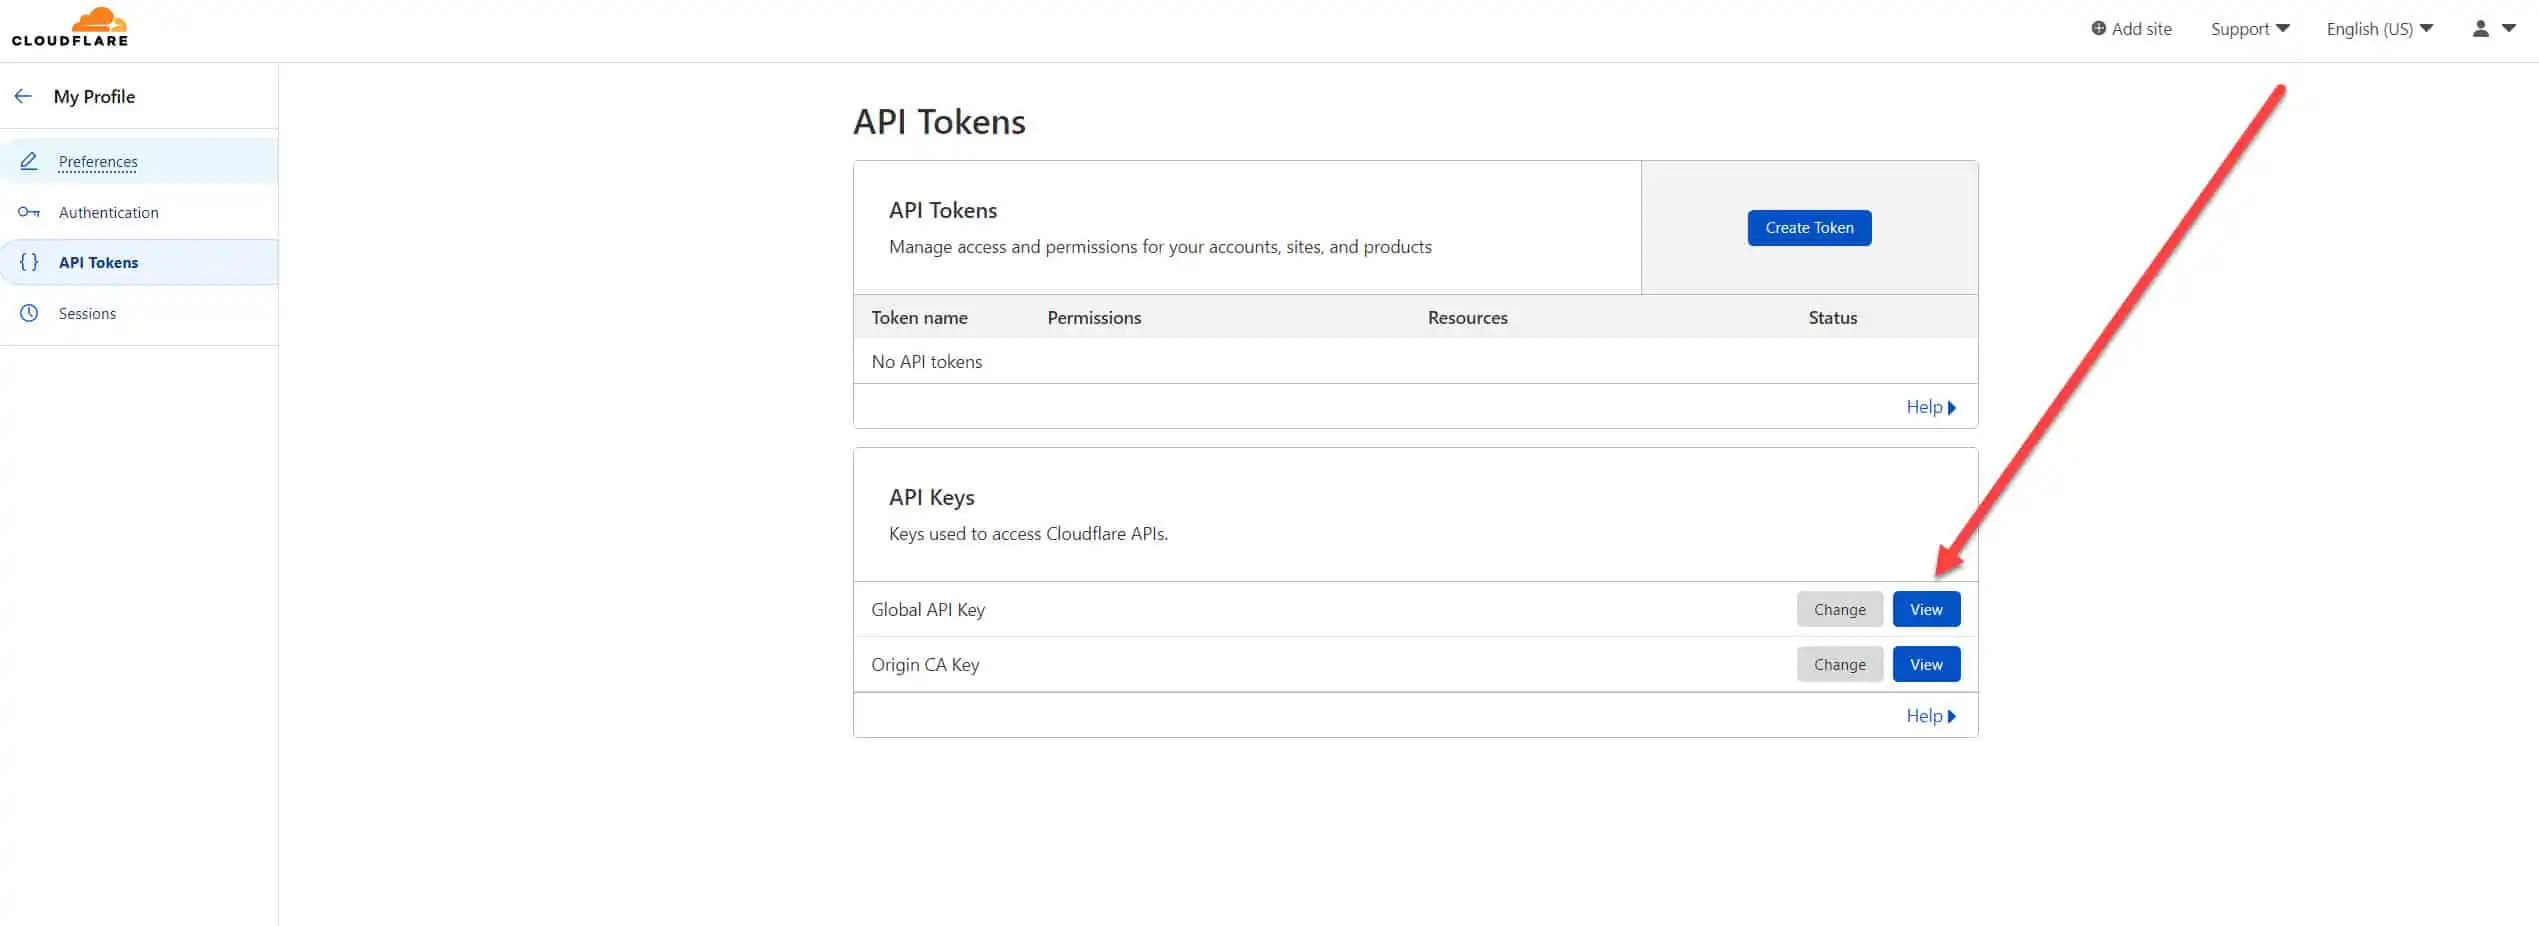
Go to your Cloudflare profile top right and select “My Profile” and then on the left-hand side select “API Tokens” You will need your password to view the key. Copy it and put it in WP Rocket.
Zone ID
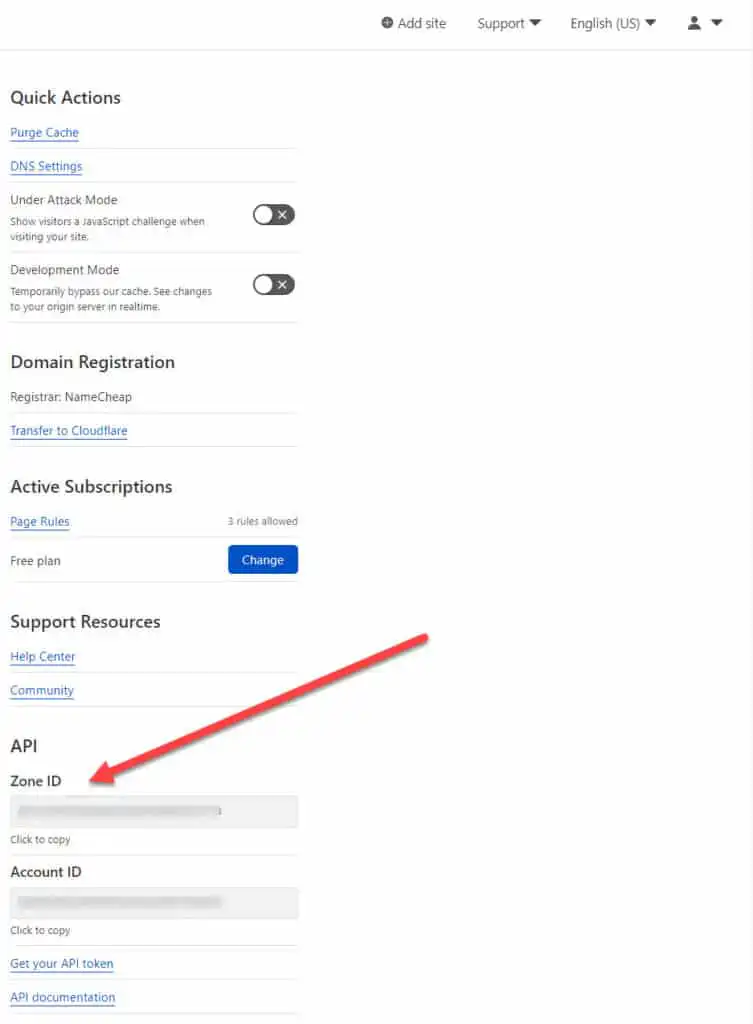
Your zone ID can be found on your main dashboard page for the website in question. It’s on the right side. Copy this and put it into WP Rocket. Lastly, add your Cloudflare email address that you used for your Cloudflare account, press save and you’re done adding Cloudflare to WP Rocket.
The Finer Details of using WP Rocket Plugin
Pretty much that’s a wrap for WP Rocket plugin but as with all things in internet life, there are other details and things to consider. Of course, you came here to learn how to configure WP Rocket Plugin but to improve your site’s performance you need to do all of the above and the following also.
- Setup and configure Memcache on your server
- Setup and configure NGINX caching on your server
For us, on Siteground we have NGINX and also Memcache on the server so we have also downloaded Sitegrounds SG optimiser plugin and activated it. We are only using it for Memcached though so we have all the minification aspects turned off so as not to conflict with the settings in WP Rocket. You can get very carried away with caching and end up having multiple plugins and caches all over the place if you’re not careful! This part of optimisation is down to your server host and what they provide.
Also of note is that not all web hosts and servers are the same. You can do all this but if you’re on a cheap shared server you still might not achieve good figures. The server is very important.
We hope you enjoyed this guide and if you did drop a comment on toehrguides you might like to see and we will write about them for you.