WordFence Security: How To Secure Your Wordpress Site From Hackers

WordFence Security Installation and Best Settings Guide
WordFence security settings cause a lot of confusion out there in internet land it seems judging by the amount of email we get asking for help in configuring it! Wordfence is great way to increase the website security on your WordPress website but it is quite a complex plugin. It is not obvious when you install it what the optimum settings actually are. This guide will hopefully clear that up for you and give you the best settings for your Wordfence installation.
Hackers Are Out There!
As I write this article someone somewhere is having their website hacked! Look at these stats!
Website security is a hot topic and securing your Wordpress Site is a must as hackers are constantly trying to gain access to it. Indeed you probably came across this article because you yourself are concerned. You sat down at your laptop and typed into Google “Wordfence Security” or some other search term.
Before I start though let’s take a look at some of the WordFence stats taken today from this website:
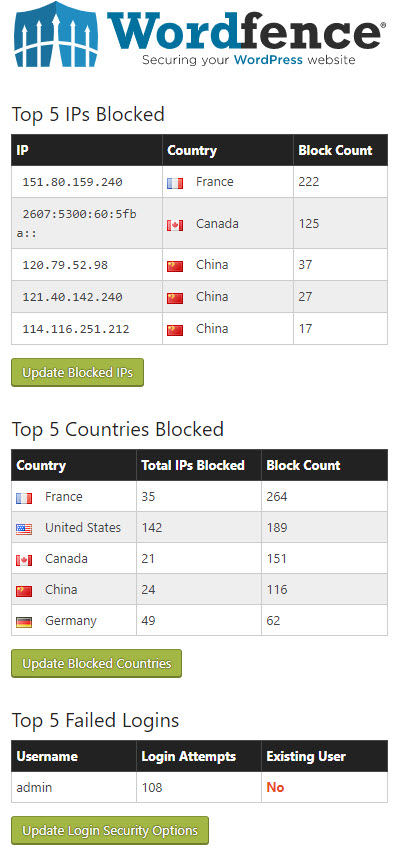
As you can see there have been a lot of attacks on my website over the past 7 days alone. There have been 108 attempts at using admin as the login username for example:
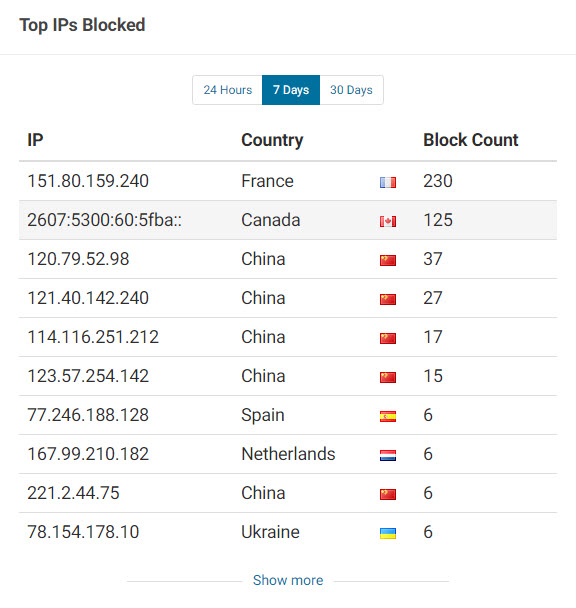
Thankfully for us we use WordFence on all our sites and also our client sites too so all of this is monitored and reported upon. The simple fact is that the day you launch a website, someone somewhere will be trying to hack it and gain access to it. To ignore this or to think it won’t happen to you is to bury your head in the sand.
With this article I am going to show you how by using the Wordfence Security plugin you can protect your WordPress Website from hackers so you don’t have to worry about it anymore. I’m going to show you how to install WordFence on your server and then set it up with the optimum settings. From start to finish it should take you about 30 minutes to get the Wordfence Security plugin installed and configured correctly.
By the time we are done your site will be protected and you can relax safe in the knowledge that you have done your utmost to prevent hackers from gaining access to it. Firstly though let’s take a look at the hacker and what he is after in the first place.
Why Do Hackers Want to Hack My WordPress Website?
It’s a good question and there a few reasons why. These are:
- They want to have a good look around and steal any hidden information the site may hold. This can be customer details, email addresses, login details to other sites.
- They want to take your site down and leave a nasty slogan or message on the index page to embarass you.
- They want to Install a virus or malware on your server so that they can create spammy links or send viruses to your visitors to using your email accounts.
So How do they gain access in the first place?
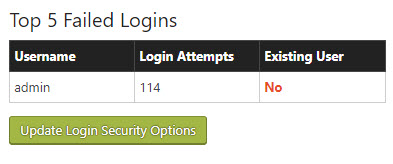
- Hackers run software programs that are constantly pinging websites. Once they have found a site the software will keep trying random login usernames and passwords until they gain access. As you can see in the image below just today we have had 114 attempts.
Now of course the username for this site is not “admin” for a start but the hackers program will be trying all sorts of combinations and they do hit on sites that are using the old classic of
admin
password
as the login details and then Et Voila they are in.
- They find a hole in your code or one of the plugins you are using. This is a more complex route into your server or website but it can be done if you have a vulnerability within your code. This is why it is important to update windows and also keep your website and its plugins up to date when new versions are released.
- Similar to the above they find a security breach in your web server itself or they guess your web servers FTP account. Again by trying combinations of admin, password etc for login usernames.
I’ve banged on about this many times. We use RoboForm for ALL our passwords and password generation and our usernames are always obscure and never ever “admin”.
Wordfence The Number One Way To Protect Your WordPress Website From Hackers
Wordfence is a FREE plugin (There is a premium version) that you can install on your wordpress site which helps to protect it from hackers and their attacks. If a hacker does manage to get through and install malware for example WordFence will help also you to remove it.
Wordfence helps to protect your site in the following key ways.
Endpoint Firewall:
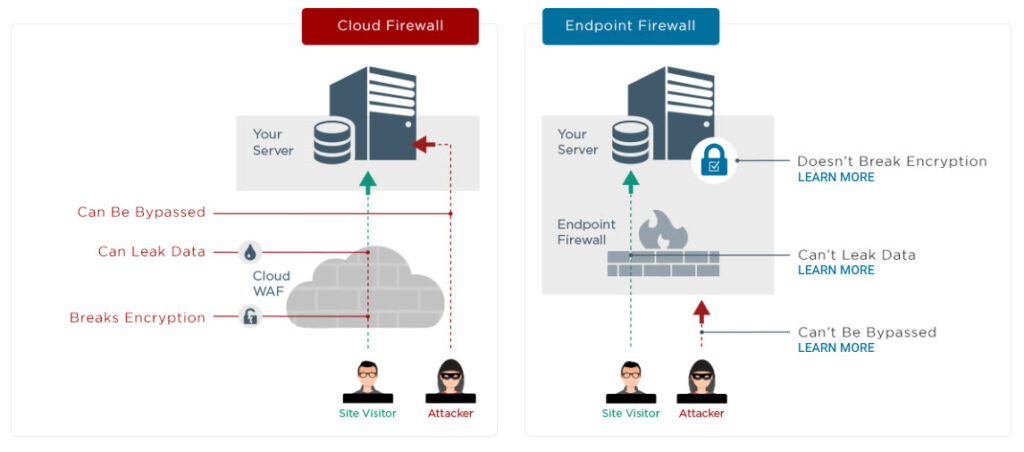
Wordfence uses and Endpoint Firewall which analyzes all data traffic BEFORE it reaches your website. If it detects a hacker it blocks them before they can reach your site.
Malware Scanner:
Wordfence has an inbuilt malware scanner that regularly scans your files, plugins and themes for malware. It also scans your pages and posts for links that hackers may have inserted into the code. You can upgrade of course to the premium version of WordFence and gain even more protection. At time of writing it’s $99 for one site for the year. We do have the premium version on all our sites but I have removed it temporarily so I can write this article showing the free version screenshots for you.
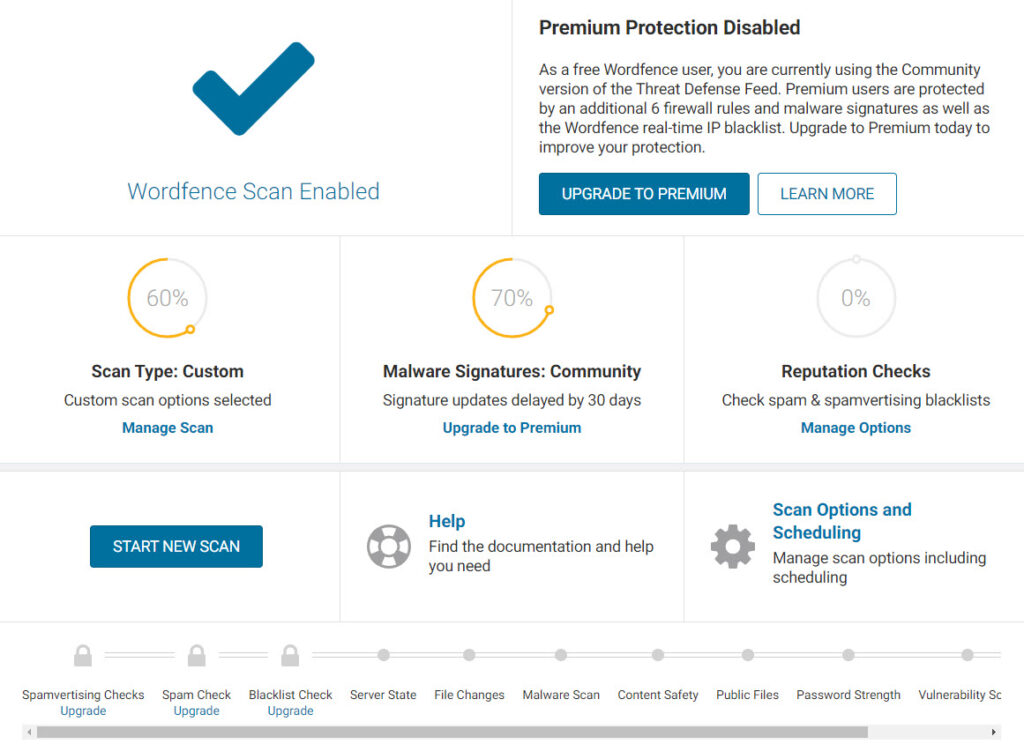
WordFence File Repair:
Wordfence has an inbuilt file repair system than enables you to:
- Find Corrupted Files
- Download the original file to compare it to the changed one and see the differences
- View and repair the file back to its original state
Wordfence also monitors real time attacks on its website which you can see on this map:

Premium or Not?
So what’s the difference between the free version and the premium version we use on all our sites and client sites for that matter? These are the main differences although they do alter this from time to time if they add additional features.
Real time Ip Blacklist:
This blocks in real time all known IP addresses that are attacking wordpress websites at the moment.
Real Time Firewall Updates:
WordFence monitors all traffic across the network and updates again in real time the firewall rules.
Country Blocking:
Allows you to literally block an entire country from accessing your site.
Malware Signature Updates:
WordFence firewall and scanner rely on malware signatures to help identify malware on your site. With the premium version this happens in real time.
Automatic Updates:
Updates to WordFence as they are needed. Free users wait for this one for 30 days.
Reputation Checks:
Checks to see if your website or IP is listed on blacklists for delivering spam or malicious activity.
So is the premium version worth it? In our opinion yes but then we run premium versions for all plugins to be honest.
How To Install and Configure Wordfence Security
Now as you may know. It’s one thing to get all these fancy plugins and another thing entirely to know how to configure them correctly! WordFence is no different here as it is quite complex and some of the rules you just won’t understand what the best setting is. So in this section I’m going to show you how to install it on a fresh site using the free version and then more importantly how to configure it.
So let’s make a start with this:
- Login to your WordPress admin
- In the menu on the left select plugins
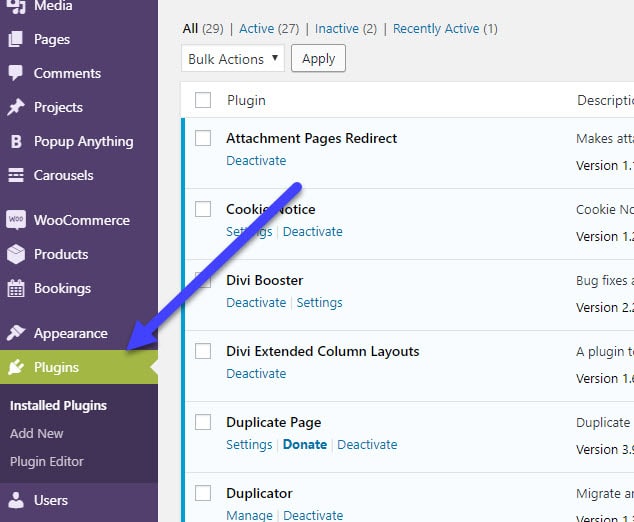
- Now Click the Add New button.
- Then type WordFence in the search box top right and hit enter.
You should now be looking at something like this.

Click Install now on the WordFence Security – Firewall & Malware Scan and then wait a few seconds while the plugin is installed. The button will then change to Activate. Click on Activate once you can.
Once you have activated it this little screen will pop up:
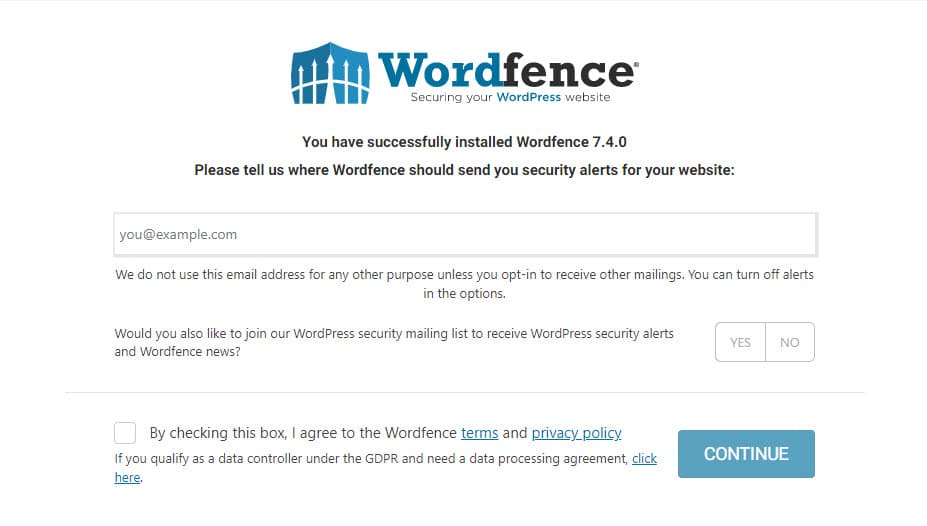
Enter your email address and decide if you would like updates via email or not. Then check the box and click Continue.
The next screen allows you to upgrade to premium. Here you can enter your premium key if you have it already or just click No thanks if you don’t as you can upgrade later if you wish to.
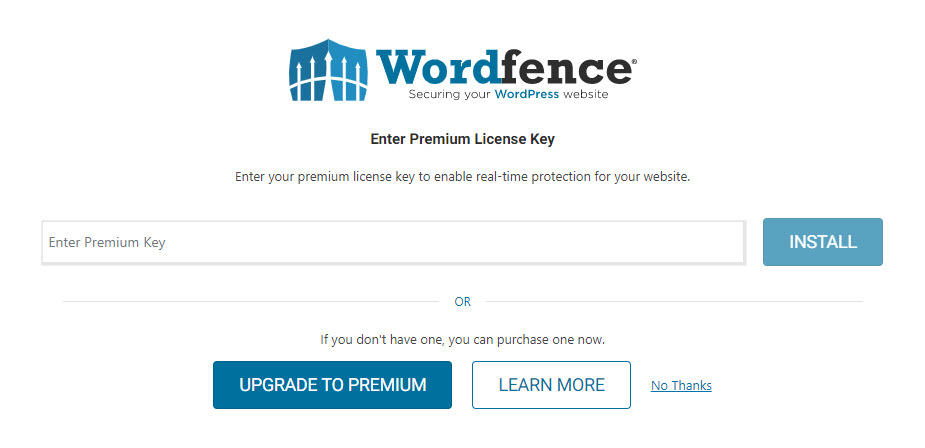
Ok thats it WordFence is now installed on your WordPress website. Now comes the bit everyone struggles over. How to set it up correctly!
Setting Up Wordfence Security The Correct Way
After activating the plugin it will appear in your left hand menu like this.

If you click this link it will take you to your dashboard and a pop up appears on the current version that looks like this.
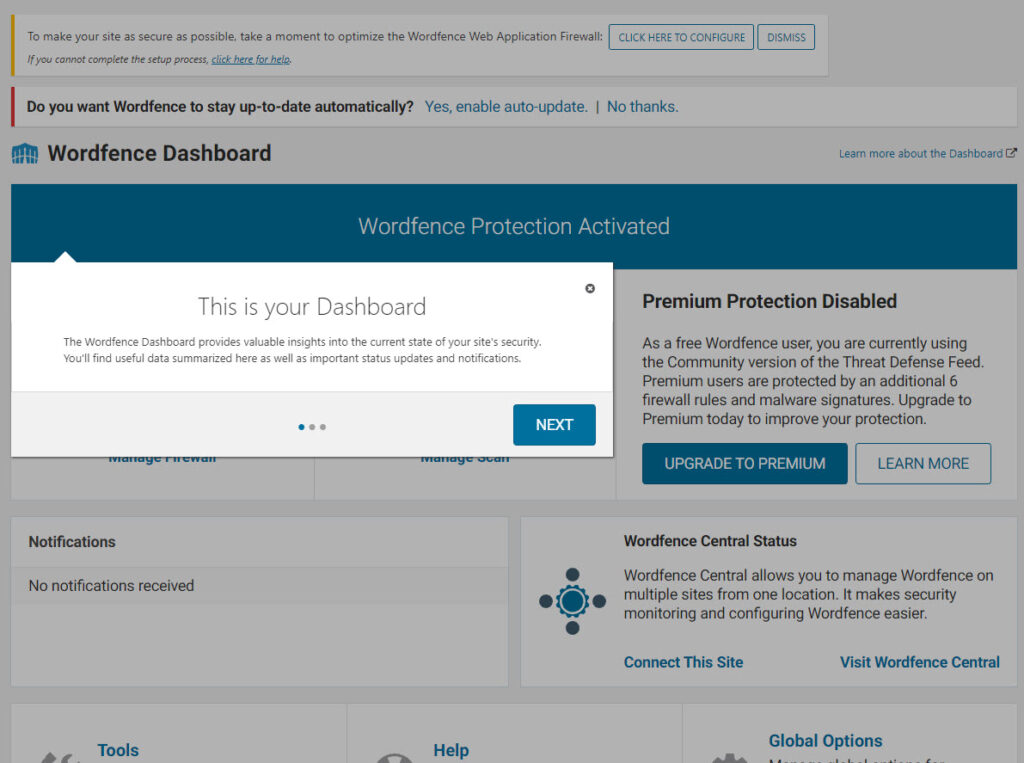
When you open each new section you will get one of those pop ups telling you what that section can do. You can click next, next etc if you want to read them or just close them with the little x in the top right corner of the box.
For our purposes I want you to click next next on all of the boxes and then scroll back to the top of the page and select “CLICK HERE TO CONFIGURE”

This will bring up this little box for you.

Press the button download .HTACCESS and save the file somewhere safe. We are downloading our .htaccess file because WordFence is going to make changes to the one on the server so this is your backup if things go wrong here.
Once you have downloaded it click on Continue. You actually can’t click continue until you have clicked on DOWNLOAD
Next you will see this little message.

Click CLOSE on this message to go back to the WordFence desktop. Now you will see this.
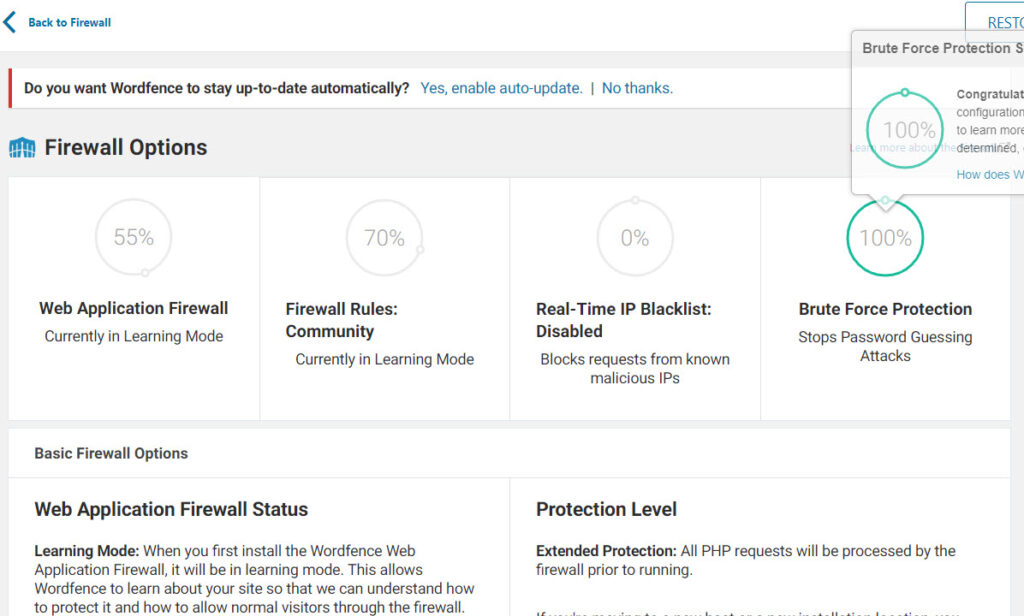
I want you to click “Yes, enable auto-update.”
All done? Nice. That message will have disappeared and you should be back to the dashboard. All good.
Looking at your dashboard you will now see that the firewall is in learning mode. This is normal. Once it has finished learning it will change over automatically to Enabled and Protecting.
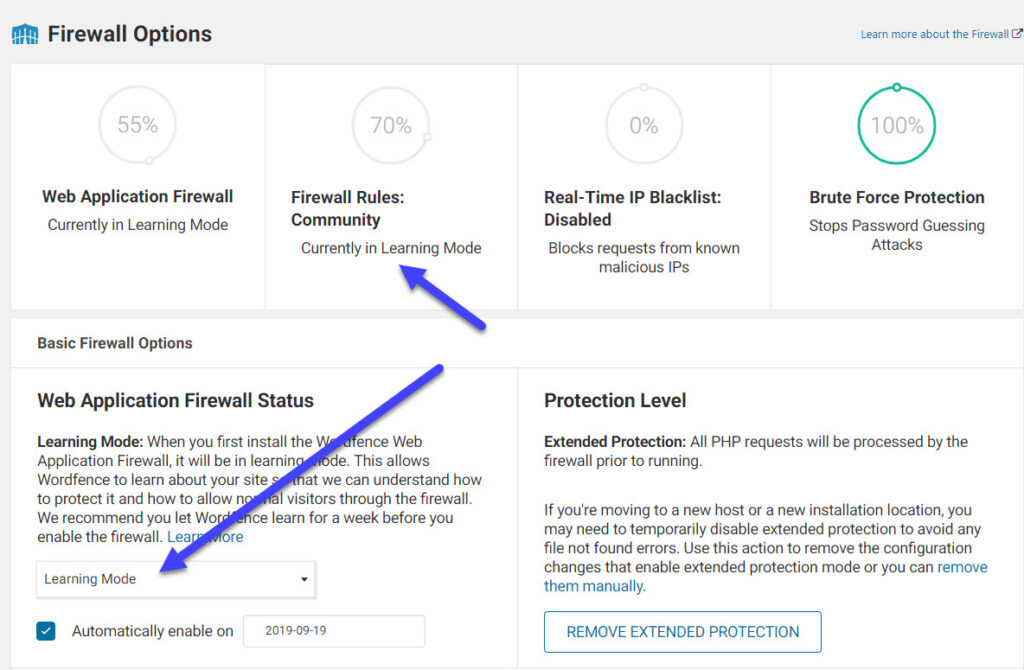
Now I want to go through all the other settings you need to configure.
Configuring Advanced WordFence Settings
Still with me? Good let’s continue. So now I want you to go back to the left hand menu and click on All Options. Like this.

That will take you to this page. Click Expand all on this page so it looks like this.
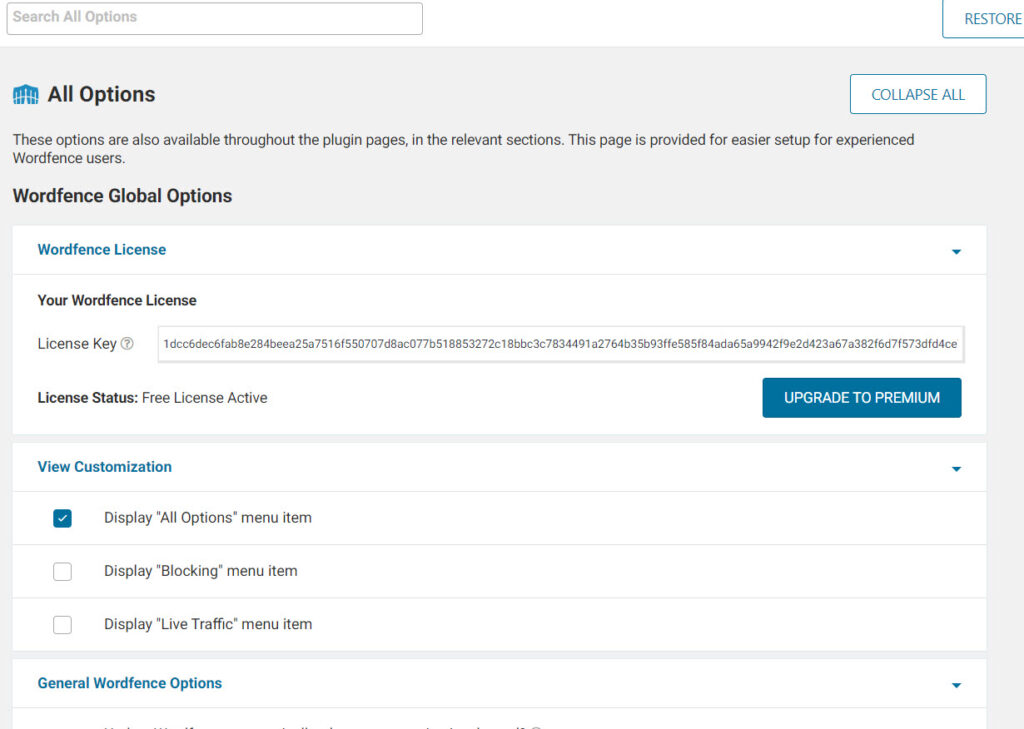
There are a lot of options here and i’ll go through each section so you can set them correctly:
WordFence License:
This one you can leave as it is. You would only change this one if you have upgraded to premium and want to add your premium license in here.

View Customization:
Set your view customisation like this one with Display “All Options” menu item checked

General WordFence Settings:
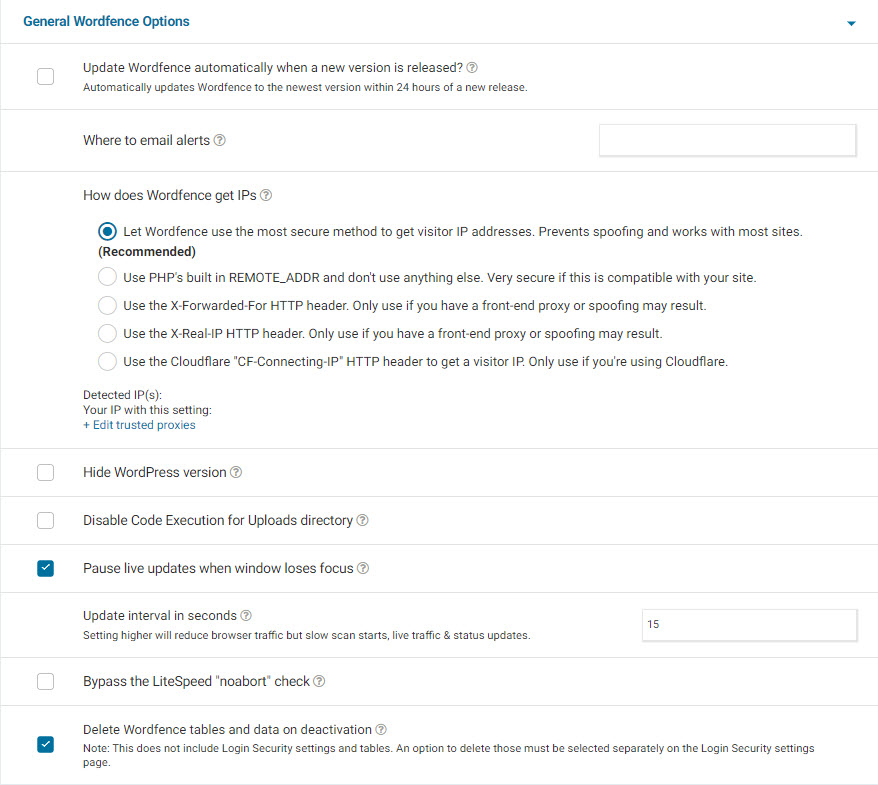
Set your general WordFence settings like mine in this slide.
- Add in the email address where you would like any alerts sending to.
- Set “Let WordFence use the most secure method to get visitor IP Addresses
- Pause live updates when window loses focus
- Update interval in seconds set to 15
- Delete WordFence tables and data on deactivation
Dashboard Notification Options:
- Make sure Scan Status is checked

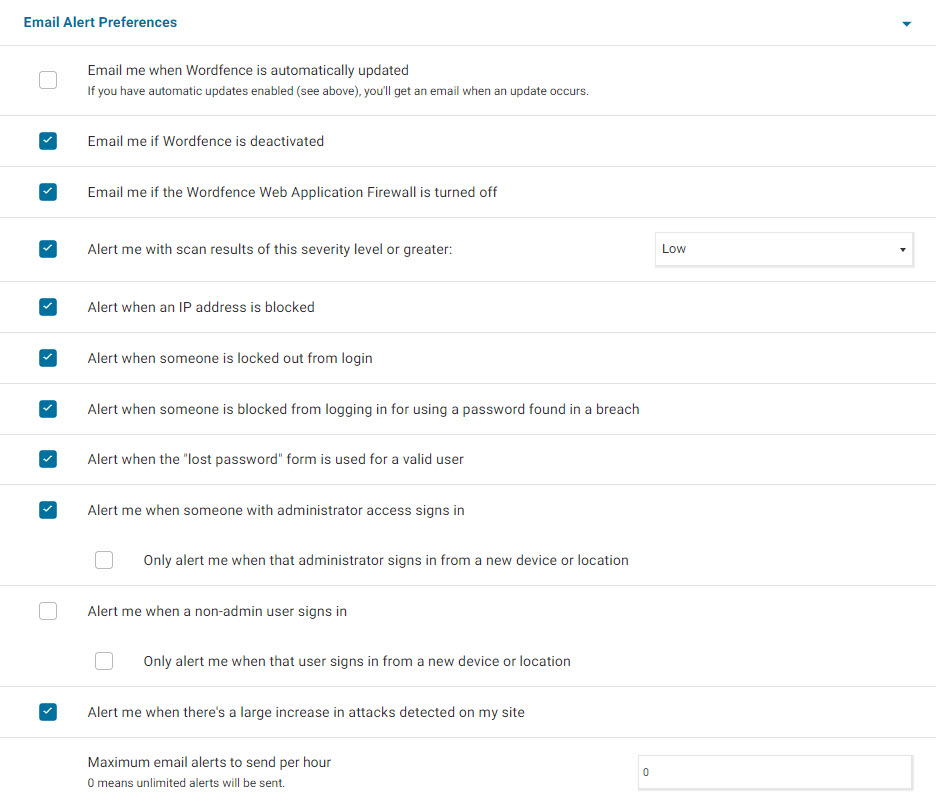
Email Alert Preferences:
This one you can set as you like. It is a list of things you will be notified about by email if they occur. This is how mine is set for our sites but you can play around with it if some of them annoy you.
Activity Report:
For this one check “Enable activity report widget on the WordPress dashboard”

Firewall Options:
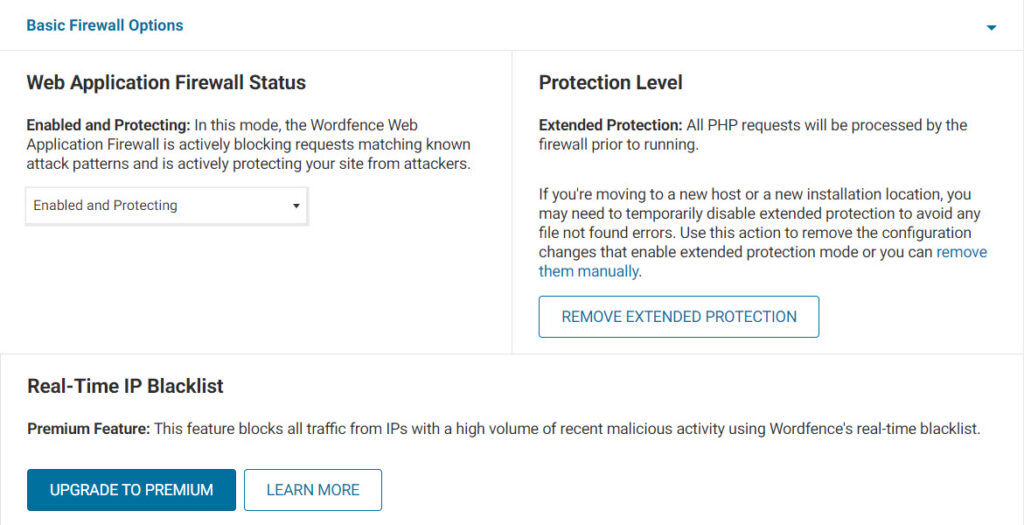
Basic Firewall Options:
As you can see on this slide my site is out of learning mode and in “Enabled and Protecting”
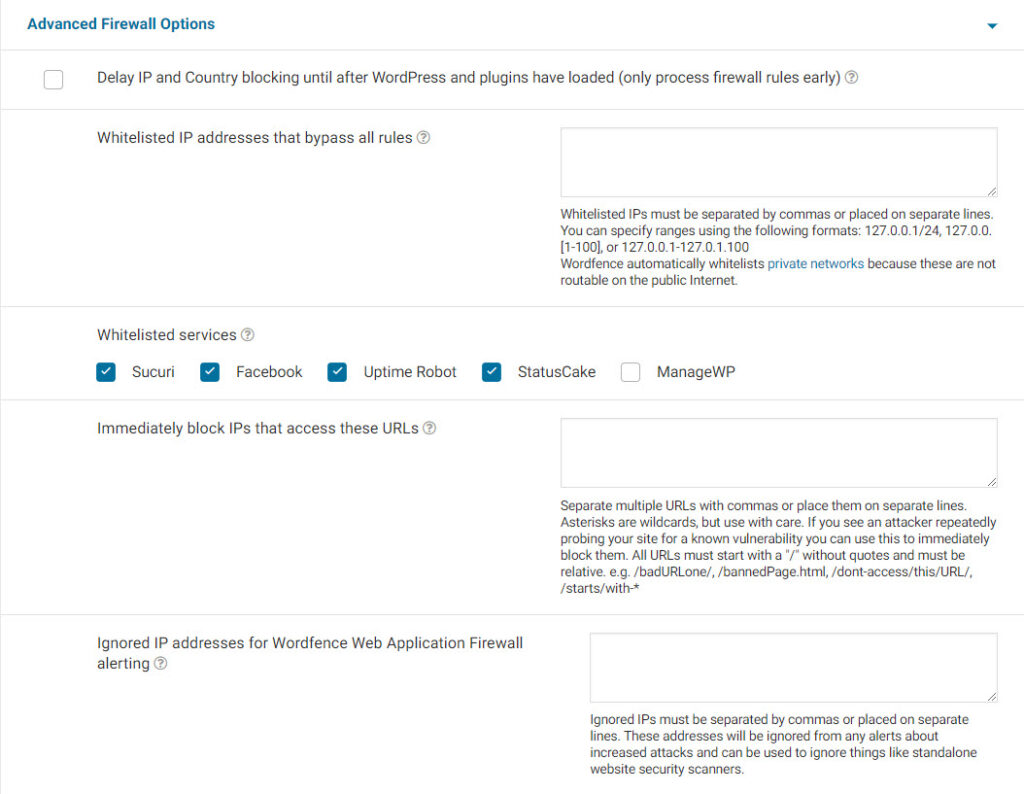
Advanced Firewall Options:
Make sure this section looks like the slide below.
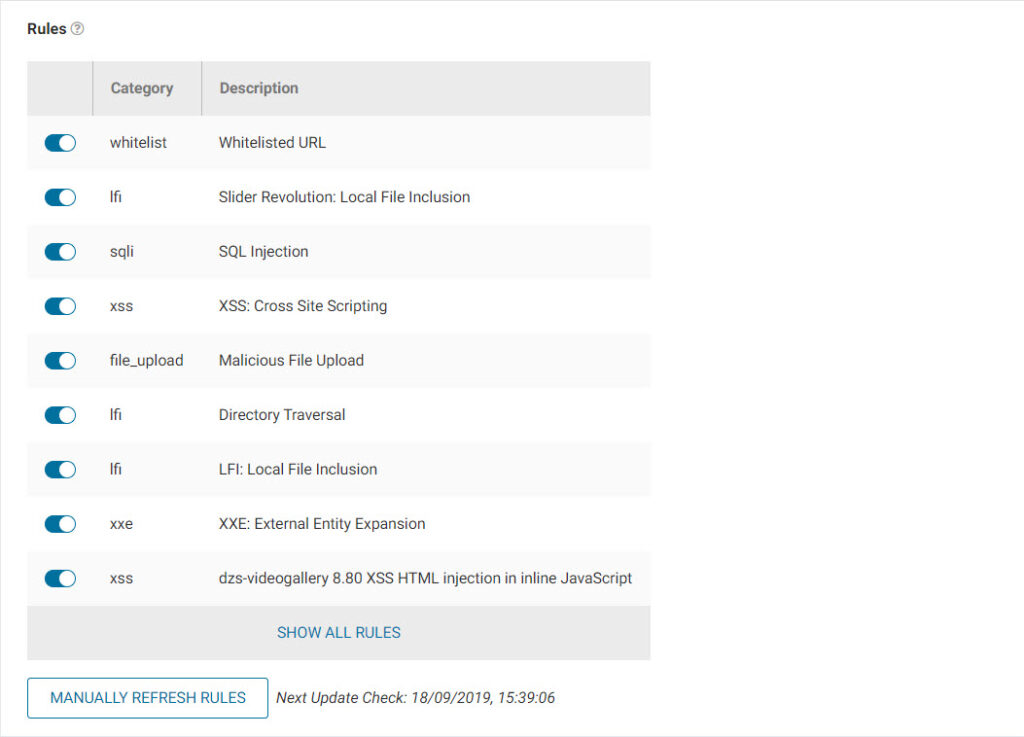
Rules:
Make sure To click the button “Expand All Rules” and then make sure ALL the Firewall rules are checked like mine are.
Brute Force Protection:
Set Brute Force protection as follows:
- Lock out after how many login failures = 20
- Lock out after how many forgot password attempts = 20
- Count failures over what time period = 4 Hours
- Amount of time a user is locked out = 4 Hours
- Immediately lock out invalid usernames = UN Checked
- Prevent the use of passwords leaked in data breaches = Checked

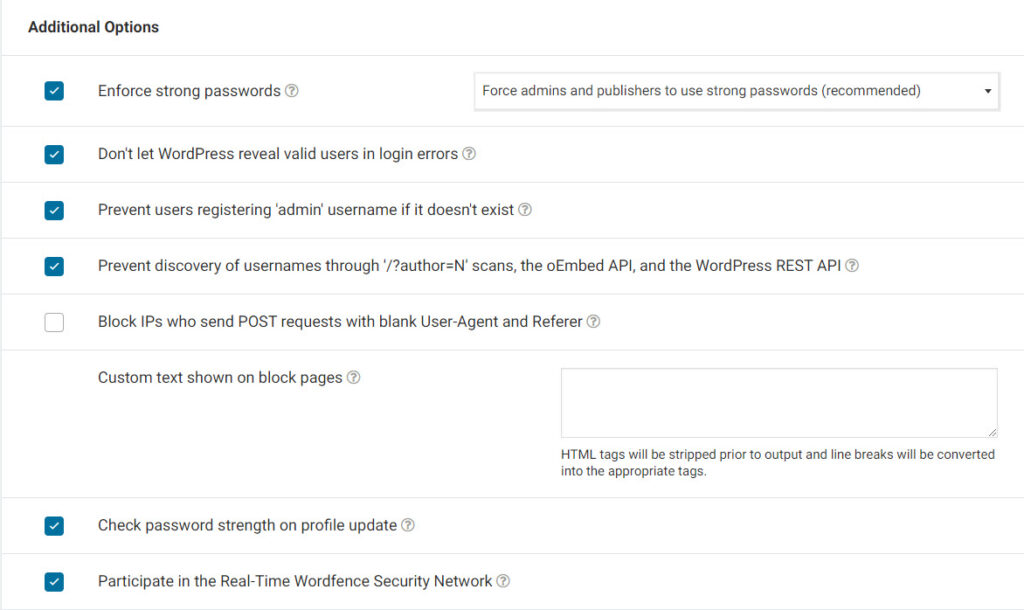
Additional Options:
For the additional brute force settings set them as follows:
- Enforce strong passwords = Checked
- Don’t let WordPress reveal valid users in login errors = Checked
- Prevent users registering ‘admin’ username if it doesn’t exist = Checked
- Prevent discovery of usernames through ‘/?author=N’ scans, the oEmbed API, and the WordPress REST API = Checked
- Block IPs who send POST requests with blank User-Agent and Referer = UN Checked
- Check password strength on profile update = Checked
- Participate in the Real-Time Wordfence Security Network = Checked
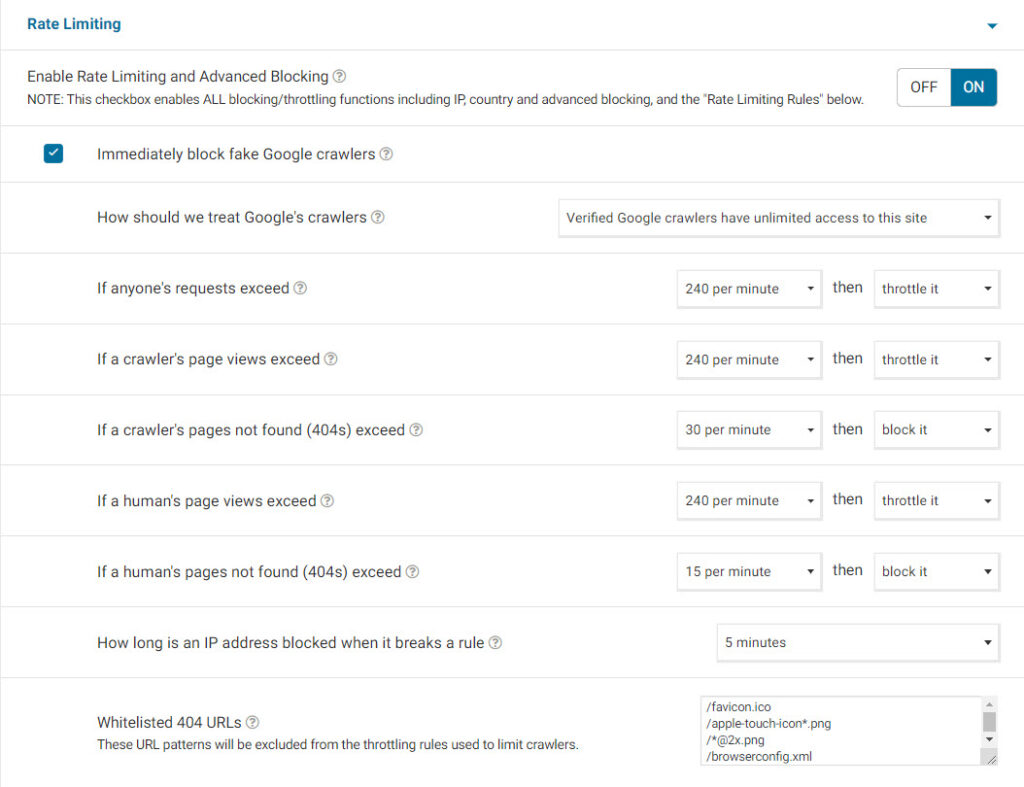
Rate Limiting:
For rate limiting set them as follows:
- Enable Rate Limiting and Advanced Blocking = Enabled
- Immediately block fake Google crawlers = Checked
- How should we treat Google’s crawlers = Verified Google crawlers have unlimited access
- If anyone’s requests exceed = 240 per min then throttle it
- If a crawler’s page views exceed = 240 per min then throttle it
- If a crawler’s pages not found (404s) exceed = 30 per min then block it
- If a human’s page views exceed = 240 per min then throttle it
- If a human’s pages not found (404s) exceed = 15 per min then block it
- How long is an IP address blocked when it breaks a rule = 5 minutes
Whitelist URLs:
On a new installation your whitelist URLs section will be empty. Wordfence will add URLs to this list and you can also add them manually yourself.

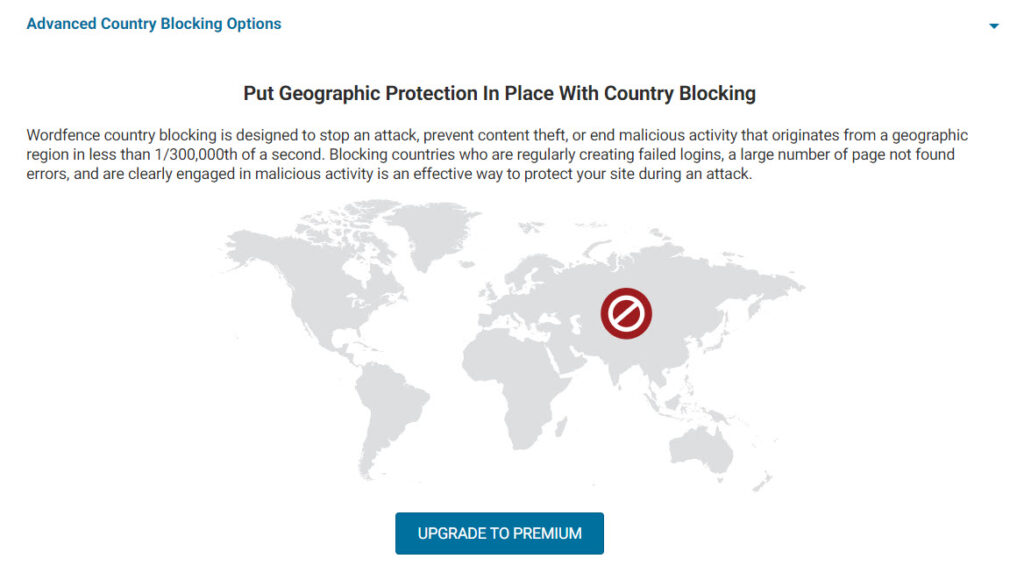
Blocking Options
Country wide blocking options is only available in the premium version so on your free installation it will look like this.
Scan Options
Scan Scheduling:
Set the following here for scan options:
- Schedule Wordfence Scans = Enabled
- Let Wordfence choose when to scan my site (recommended) = Checked
- Custom scan
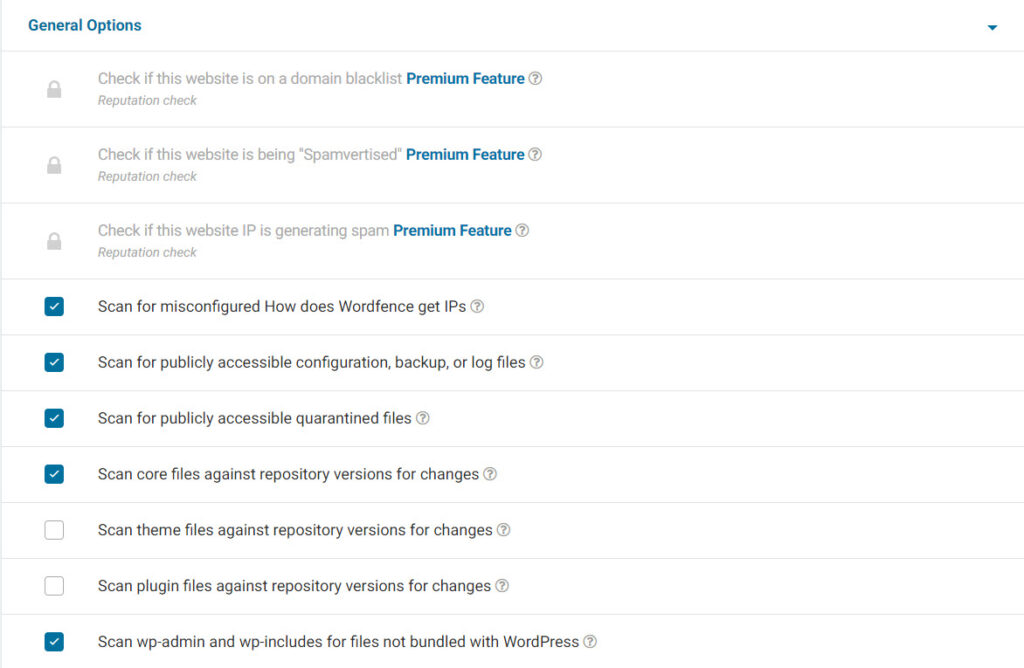
General Options:
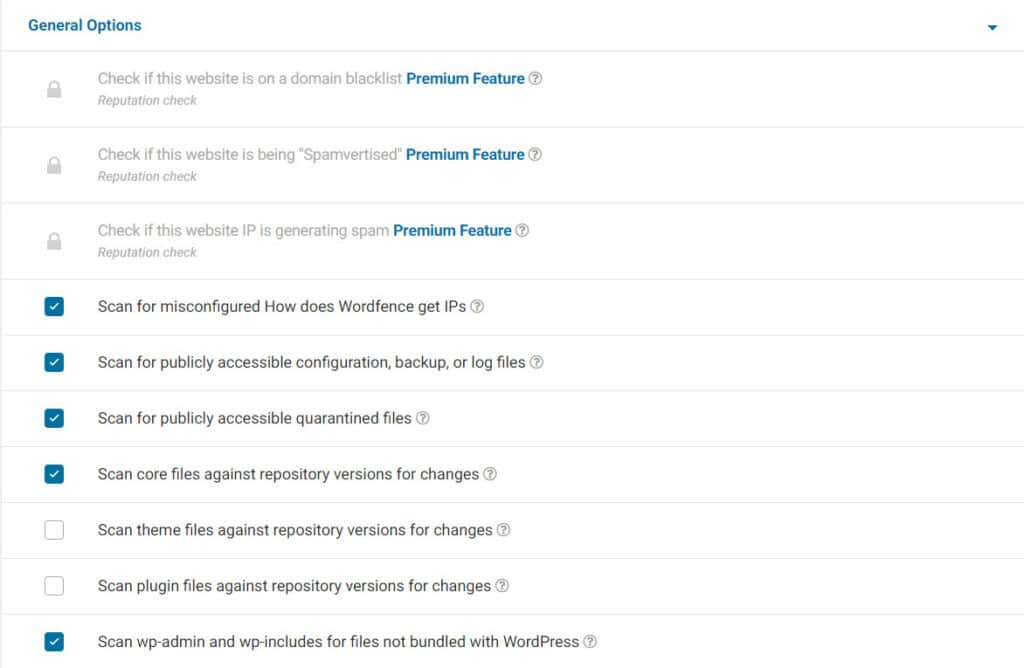
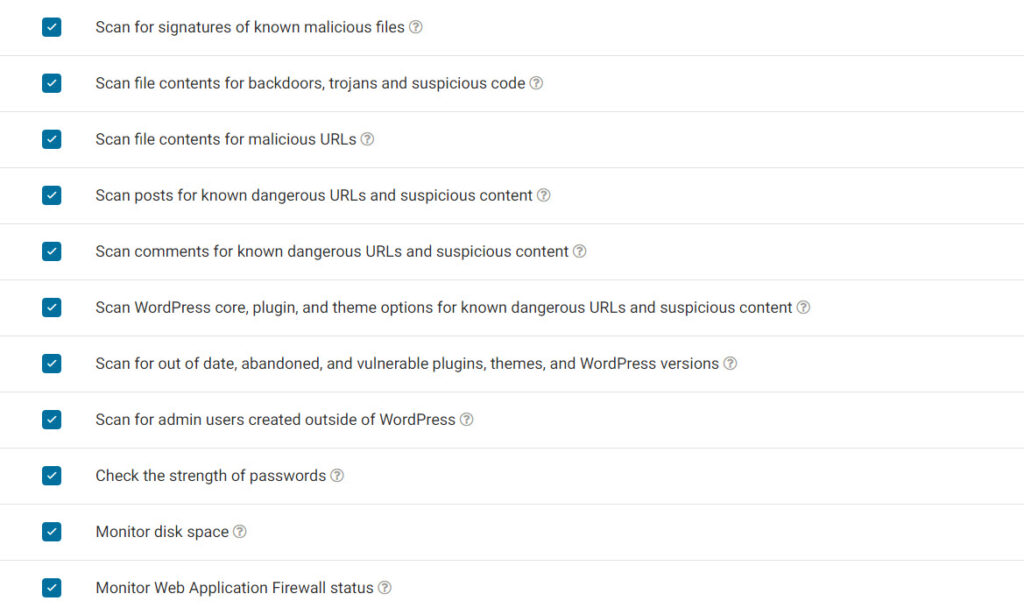
Set the following Scan options as mine are in the below slide.

Performance Options:
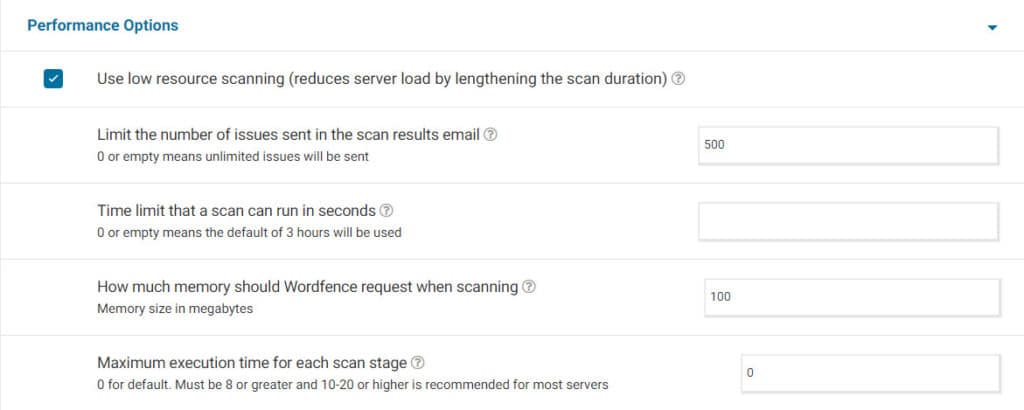
Use the following performance settings:
- Use low resource scanning (reduces server load by lengthening the scan duration) = Checked
- Limit the number of issues sent in the scan results email = 500
- Time limit that a scan can run in seconds = empty
- How much memory should Wordfence request when scanning = 100
- Maximum execution time for each scan stage = 0
Advanced Scan Options:
You can leave these two blank.

Tool Options
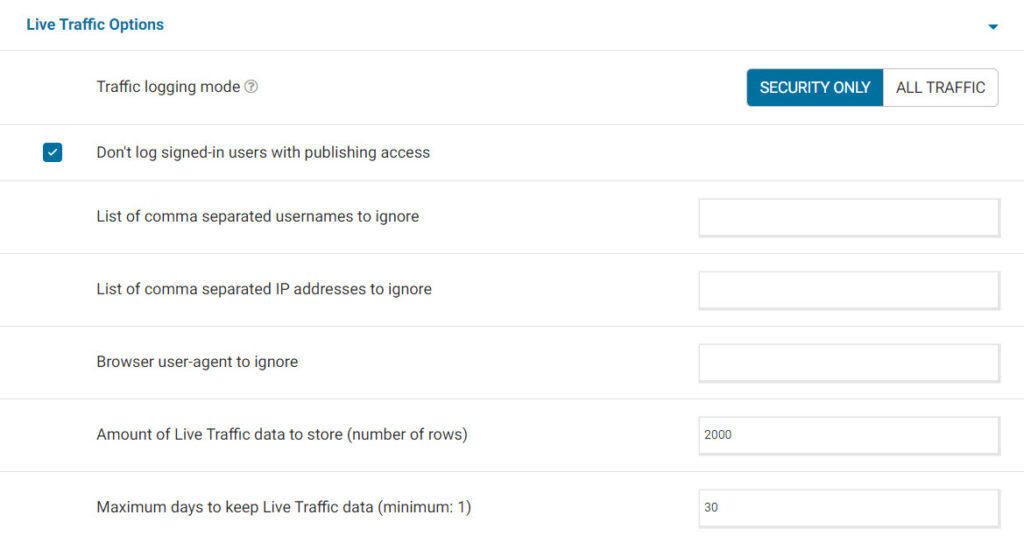
Live Traffic Options:
For the live traffic options set them as mine are in this slide.
The remaining two options on this page are your import and export settings options. You can save all these settings and export them and then if you setup a new site just import them all. This is what we do for clients and it speeds up the whole process.
Great job that’s it you’re done with all the major settings now for WordFence. WordFence will now work on keeping your site safe from all the hackers out there. It will email you details of scans and any potential threats. As with all WordpRess plugins make sure to keep it up to date with new versions as they become available to you.
If you need help with your site or plugin installation be sure to drop us a line Here:




0 Comments